
edgeCore version: 5.2.0
Overview
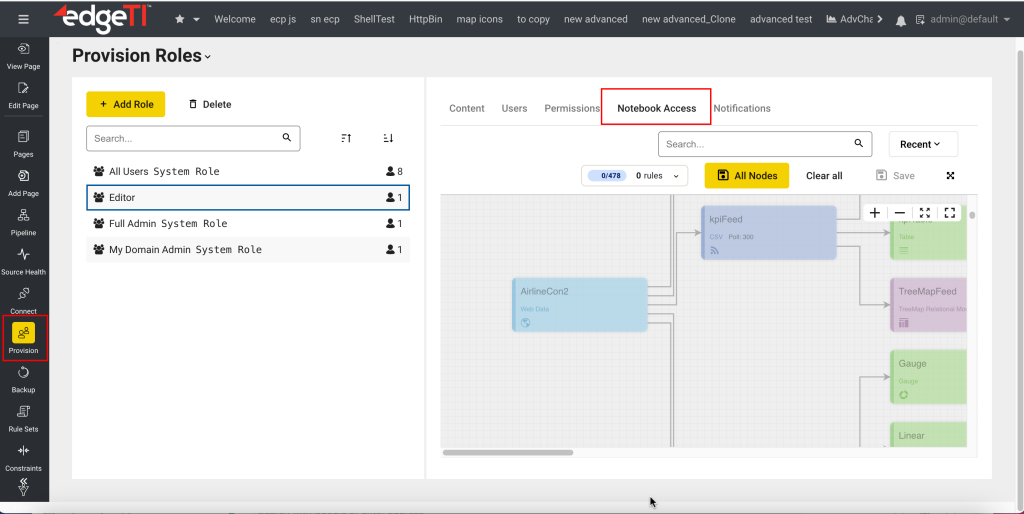
The Notebook Access tab in Provisioning enables the administrator to choose exactly which parts of the data pipeline a user can see in the AI Notebook. Instead of all-or-nothing access, you can grant a user only the charts, data sources, filters, and transforms they need. Everything you do not grant stays hidden from them.
You can set these rules for a single user, for a role, or for a domain. The editor works the same way in all three places, only the audience changes.
Prerequisites
A user needs two separate things to work with the pipeline data in the AI Notebook:
- the Notebook permission
and - Notebook Access grants
Setting one does not set the other.
| Setting | Where to set it | What it controls |
| Notebook permission | Provision > Roles > Permissions | Whether the AI Notebook item appears in the user’s menu |
| Notebook Access grants | Provision > Users, Roles, or Domains > Notebook Access tab | Which pipeline nodes the user can see inside the AI Notebook |
If a user has Notebook Access grants but not the Notebook permission, they will not see the AI Notebook in the menu. Instead, they see the message “Content has not been provisioned.”
The Notebook Access tab is always available to admins for any user, role, or domain. It does not depend on whether that user, role, or domain holds the Notebook permission. You can set up access in advance and turn on the permission later.
Admin rights are required. Only admins can grant the Notebook permission or edit Notebook Access. If a non-admin needs to manage notebook access for others, an admin must handle it.
Where to Find Notebook Access
Log in as an admin and open Provision. The Notebook Access tab appears in three places:
| Location | Who the rules apply to |
| Provision > Users > select a user > Notebook Access | That one user |
| Provision > Roles > select a role > Notebook Access | Everyone with that role |
| Provision > Domains > select a domain > Notebook Access | Everyone in that domain |
All three tabs look and work the same.
A user’s grants from all three levels combine. For example, if a role grants a data source, users with that role can see it even when their own user-level rules do not include it. To restrict what someone sees, check their user, role, and domain rules together.
The Notebook Access tab
The tab has two parts: a toolbar across the top and a pipeline diagram below it.
The diagram shows the entire data pipeline. Each chart, data source, filter, and transform is a node, and lines connect each node to the nodes it feeds. The diagram is read-only: you can grant access from it, but you cannot change the pipeline itself.
Node appearance shows access at a glance: Bright nodes are visible to the selected user, role, or domain, whereas faded nodes are hidden from them. The diagram updates as soon as you add or remove a rule, so you can see the effect before you save.
Granting Access with the Hover Menu
Hover over any node to show a ring of five buttons around it. Each button adds a rule with a different access shape, starting from that node.
| Button | Position | What it grants |
| Just this | Top | Only this node |
| + one upstream (<) | Top-left | This node and the nodes that feed directly into it |
| + all upstream («) | Bottom-left | This node and every node that feeds it, back to the original data sources |
| + one downstream (>) | Top-right | This node and the nodes that read directly from it |
| + all downstream (») | Bottom-right | This node and every node that uses it, all the way forward |
The node you start from is called the rule’s anchor.
Example: Choosing + all downstream on the AirlinesFeed data source grants AirlinesFeed and its full chain of 10 downstream nodes. The counter changes from 0 to 10.
Tip: To give someone a chart and everything needed to produce it, use + all upstream on the chart.
Using the Toolbar
The toolbar sits at the top right of the diagram. From left to right:
| Control | What it does |
| Counter pill | Shows visible nodes, total nodes, and rule count; for example, 19/678 · 5 rules. Hover or click it to open the rules panel. |
| All Nodes (yellow button) | Grants access to every node, with no rules needed. Stays highlighted yellow while active. |
| Clear all | Removes every rule and the All Nodes setting. The user, role, or domain loses all pipeline access. |
| Save | Saves pending changes. Greyed out when there is nothing to save. |
| Expand (diagonal arrows) | Opens the editor full-screen for large pipelines. Saved changes carry back to the regular view when you close it. |
Rules Panel
The rules panel lists every rule you have added. Each rule shows its anchor node and its access shape. To remove one rule, click its ×. To remove all rules, click Clear all at the top of the panel.
Progress Bar
A thin bar appears under the toolbar while the page loads the pipeline, loads rules, or saves. Wait for it to disappear before you continue.
What Users See in the AI Notebook
Grants take effect in the Add pipeline source list in the AI Notebook. Admins see every data source. Other users see only the sources they have been granted.
Only cards that produce a dataset, such as feeds and filters, appear as selectable sources. Visualization nodes (for example, AirlinesTable or AirlineFlowModel) never appear in the source list, even for admins. Granting a visualization node on its own has no visible effect in the notebook.
To make the data behind a visualization available, grant the feeds and filters that feed it. Using + all upstream on the visualization node does this in one step.
Troubleshooting
| Problem | Cause | Solution |
| The user sees “Content has not been provisioned” or no AI Notebook menu item. | They do not have the Notebook permission. | Add the Notebook permission to one of their roles in Provision > Roles > Permissions |
| A granted node does not appear in the user’s source list. | The node is a visualization, not a dataset-producing node. | Grant the feeds or filters behind it, for example with + all upstream. |
| The user still sees a source after you removed their user-level rule. | A role or domain they belong to also grants it. | Check the Notebook Access tab for their roles and domain. |
| Changes did not take effect. | The changes were not saved. | Click Save and wait for the progress bar to finish. All Nodes and Clear all save automatically. |
| You cannot find the Notebook Access or Permissions tab. | You are signed in without admin rights. | Ask an admin to make the change. |