Loops repeat a specific set of actions a certain number of times, and as such are used to automate repetitive tasks.
Simple Loop Example
You can watch the video showcasing how a loop is created and used.
In this example, we have used a loop to create a chessboard by adding white and black boxes.
We have started by creating an HTML template visualization with the following configuration in the HTML Renderer tab:
<div style="height: 320; width: 285px; border: 1px solid black; margin-top:50px; margin-left:120px; padding:10px" id="title"> </div>


<div style="height: 320; width: 285px; border: 1px solid black;  margin:20px; margin-left:120px; " id="box">


</div>
and the following in the JavaScript Renderer tab:
component.stepTwo = () => {
 // alert("test ..." + JSON.stringify(component.rows));

 // document.getElementById('sys_original.incident.state').value = 2;
  console.log("Test", document.getElementById('sys_original.incident.state'));
//  component.fireRowClickEvent({'Name':'stepTwo'});

};
After recording our RPA script, this is what the steps look like in the Script Center:
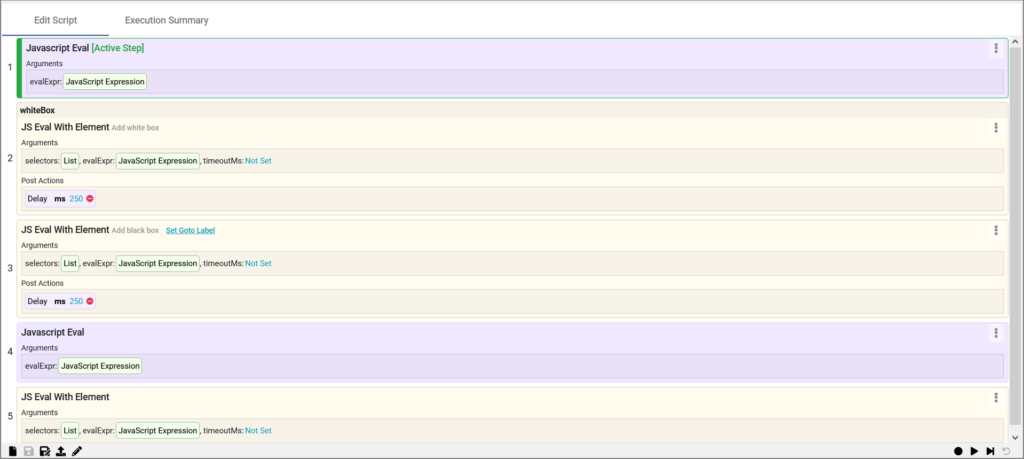
■ For the first step — Javascript Eval, we have used the following JavaScript Expression:
scriptVar.counter = 0;
■ For the second step — JS Eval With Element (used to add a white box), we have used the following JavaScript Expression:
$(element)
// Create text box
var newDiv = document.createElement(“div”);
newDiv.style.cssText = ‘width:40px;;height:40px;display:inline-block;background-color: #fffbe8;’;
$(element).append(newDiv)
■ For the third step — also JS Eval With Element (used to add a black box), we have used the following JavaScript Expression:
$(element)
// Create text box
var newDiv = document.createElement(“div”);
newDiv.style.cssText = ‘width:40px;height:40px;display:inline-block;background-color: black;’;
$(element).append(newDiv)
■ We have used Javascript Eval and the following JavaScript Expression as the fourth step:
scriptVar.counter = scriptVar.counter + 1;
if(scriptVar.counter < 28) {
scriptRunner.goto(‘whiteBox’);
}
■ The final step is JS Eval With Element and the following JavaScript Expression:
var heading = document.createElement(‘h1’);
heading.innerText = “Success!”
$(element).append(heading);
Complex Loop Example
For the purpose of this example, we have created a ServiceNow Web Content visualization and recorded a script that creates a pop-up where we should upload a .csv file containing user information. After uploading the file, the script will then transform data from that file into script variables. The next step is to create JS Eval step for each field in the user form. Finally, the last step is to create a loop which will run the script for each row in the .csv file. You can watch the video here.
After recording our RPA script, this is what the steps look like in the Script Center:
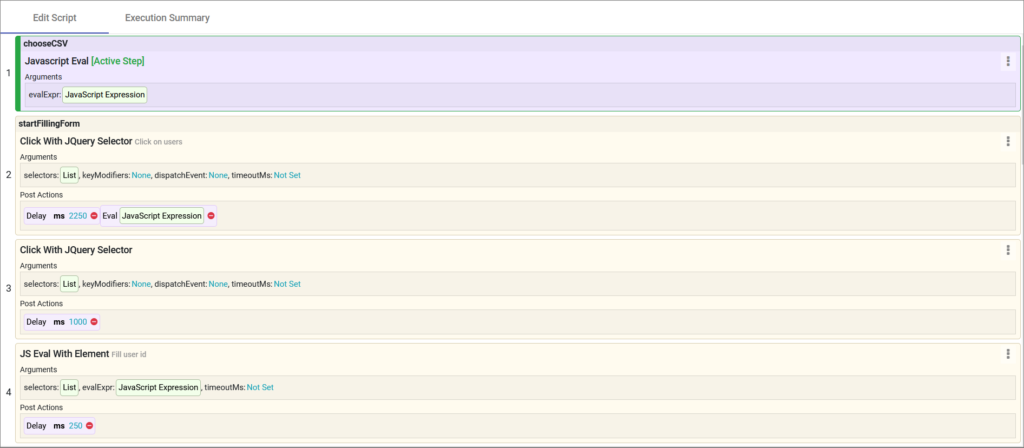
■ For the first step — Javascript Eval (used to upload a CSV), we have used the following JavaScript Expression:
var mainBody = document.getElementsByTagName(‘body’)[0]
// Create main div that covers whole page
var mainDiv = document.createElement(“div”);
mainDiv.style.cssText = “background-color: rgba(0,0,0,.3);width: 100%;height: 100%;position: absolute;top: 0;left: 0;z-index: 5000!important;padding-top:20vh;display: flex;justify-content: center;”
// Create text box
var newDiv = document.createElement(“div”);
newDiv.style.cssText = ‘width:300px;padding-top:10px;height:120px;display:inline-block;border:2px solid #000;-moz-box-shadow: 0px 0px 8px #fff;text-align:center;background-color: rgba(0,0,0,.6);’;
// Heading
var texth4 = document.createElement(“h4”);
texth4.style.cssText = “color: #fff”;
texth4.innerHTML = “Choose .csv file”
var input = document.createElement(“input”);
input.type = ‘file’
input.accept = “.csv”
input.id = “user.input”
input.style.cssText = “display: block; margin: 0 auto”;
var csvResult;
input.onchange = function(event) {
var reader = new FileReader();
reader.onload = function () {
csvResult = reader.result
var rows = csvResult.split(‘\n’)
var header = rows.shift()
rows = rows.map(el => el.split(‘,’))
console.log(rows)
scriptVar.users = rows
};
// start reading the file. When it is done, calls the onload event defined above.
reader.readAsBinaryString(input.files[0]);
}
// Create button and add onClick event to continue the script
var newBtn = document.createElement(“button”)
newBtn.className = ‘btn btn-primary’;
newBtn.style.cssText = ‘margin-top: 0.5rem’;
newBtn.innerHTML = ‘Confirm’;
newBtn.onclick = function () {
console.log(“User input: ” , document.getElementById(‘user.input’).value);
scriptRunner.doRun() // Continue script execution
mainBody.removeChild(mainBody.lastChild);
};
// append all
newDiv.appendChild(texth4)
newDiv.appendChild(input)
newDiv.appendChild(newBtn)
mainDiv.appendChild(newDiv)
mainBody.appendChild(mainDiv);
scriptRunner.stop() // Stop script execution
■ For the second step that will start filling in the form, the following JavaScript Expression is used:
scriptVar.clipboard = result;
var counter = 0;
if(scriptVar.counter != undefined){
scriptVar.counter = scriptVar.counter + 1
} else {
scriptVar.counter = counter;
}
■ The fourth step is used to fill in the user ID, and the following JavaScript Expression is used:
//console.log(scriptVar.users)
$(element).val(scriptVar.users[+scriptVar.counter][0])
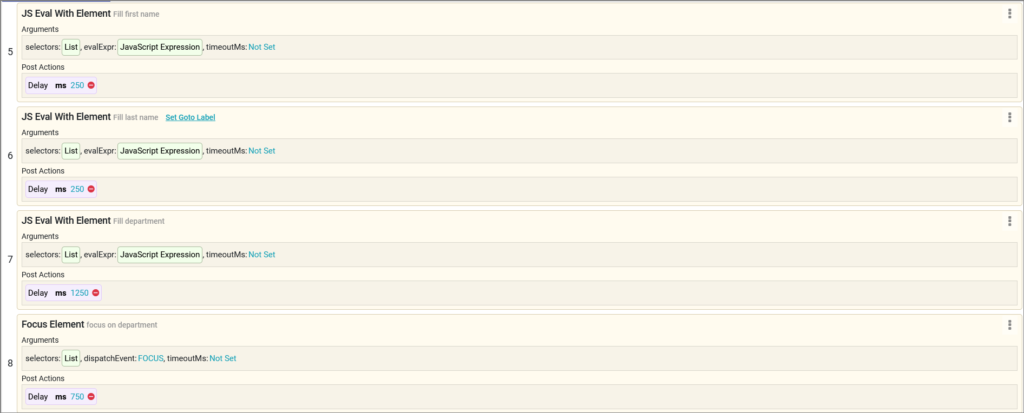
■ The fifth step fills out the first name, and the following expression is used:
$(element).val(scriptVar.users[+scriptVar.counter][1])
■ The sixth step fills out the last name, and the following expression is used:
$(element).val(scriptVar.users[+scriptVar.counter][2])
■ The seventh step fills out the department, and the following expression is used:
$(element).val(scriptVar.users[+scriptVar.counter][3])
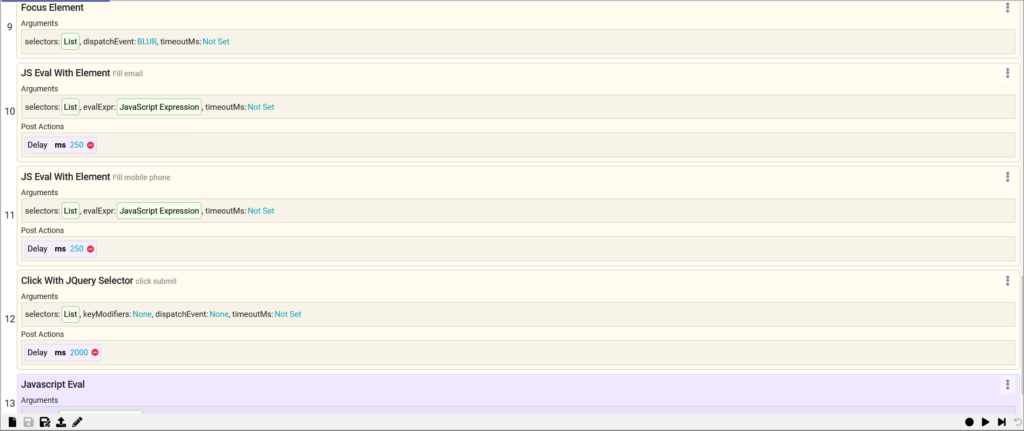
■ The tenth step fills out the email, and the following expression is used:
$(element).val(scriptVar.users[+scriptVar.counter][4])
■ The eleventh step fills out the mobile phone, and the following expression is used:
$(element).val(scriptVar.users[+scriptVar.counter][5])
■ The last step is Javascript Eval, where the following expression is used:
console.log(scriptRunner)
if(scriptVar.users.length > scriptVar.counter + 1) {
scriptRunner.goto(“startFillingForm”)
}