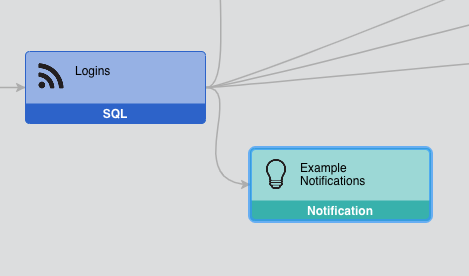
Notifications are used to alert on any change in data. They can be attached either on Feeds or Transforms further down the line. When set up, they can be triggered by data getting updated from the specific Feed or Transform. Notifications can be set to show a specific message or various attributes, and also perform specific actions such as Show Record Details, Switch To Page, or Show Visualization.
Notification Configuration
Determine which Feed or Transform you would like to add to your notification. Attach a notification by clicking the gear icon on the Feed or Transform and choosing the “New Notification” icon:
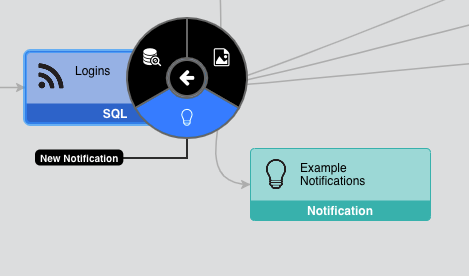
Clicking the “New Notification” icon will automatically launch the notification configuration wizard.
Notification configuration is broken out into four steps:
- Base
Sets the primary information about the notification. - Attributes
Details the attributes to display when the notification pops up. - Actions
Details the Action(s) to be provided in the notification, if any when the notification is triggered. - Preview
Shows a preview of the notification.
Step 1: Base
This step sets the overall information about the notification.
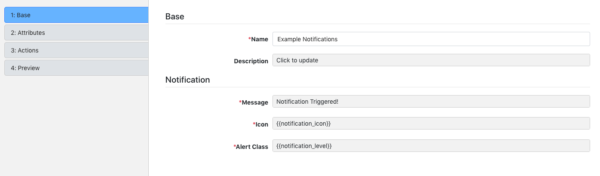
- Name – The symbolic name used to represent this notification. This is the name that will be referenced elsewhere in edgeCore regarding this notification.
- Description – An optional description summarizing the purpose of this notification.
- Message – The message to be displayed to the user when this notification is triggered.
- Icon – An angular expression that defines the icon to be displayed with this notification. You can use the double curly brackets to substitute named attributes from the data source.
- Alert Class – An angular expression that defines the icon to be displayed with this notification. You can use the double curly brackets to substitute named attributes from the data source.
Step 2: Attributes
This step details the attributes to display when the notification pops up on the screen. Note: notifications will pop up inside the browser – not as system notifications.
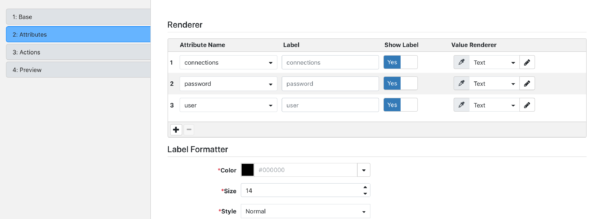
- Attribute Name – Determines the record values that will appear in each list item.
- Label – Label acts as a description for values that appear in a list. The Label defaults to the Attribute Name, but can be overwritten with something better optimized for display.
- Show Label – This property determines whether a label will appear next to a value within a list item.
a. Yes – A label will be shown to the left of the value.
b. No – Only the value will be shown. - Value Renderer – Determines the renderer to use with the associated attribute. The value renderer determines how record values for each attribute are presented. The available renderers will vary based on the data type of each attribute.
a. Icon
b. Number
c. Text
d. Date
Step 3: Actions
In this step, you can optionally provide and configure one or more Actions that the user can choose to invoke from within the notification.
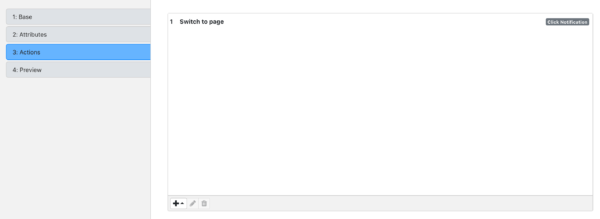
In the above example, a Switch To Page Action will be provided that the user can execute, if desired, on notification alert.
Step 4: Preview
In this step, a sample notification is provided based on the current configuration.
Role Configuration
There is one more step that is needed in order for notifications to work. You will have to assign each notification to a specific role(s) that you would like to have access to and be able to see these notifications.
That is done via the Provisions menu under Roles:

Perform the following steps to assign a notification to a Role:
- Under the “Manage By” drop-down, select Roles.
- Click a Role to which you want to assign the notification.
- Click the “Notifications” sub-tab.
- Check the box to assign each notification that you want to allow for the selected Role.
Usage
Once setup of notifications is finished, they will be triggered each time that data is updated for the Feed or Transform to which notifications are connected. Notifications will look like this:
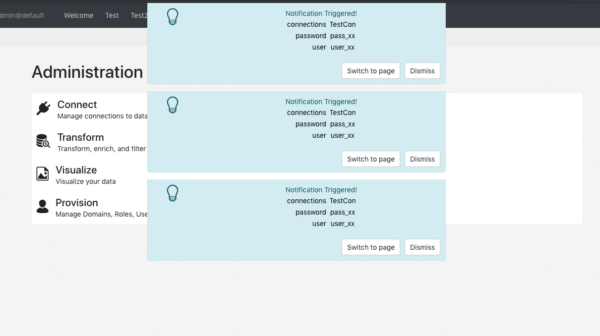
From what you can see here, notifications will pop up in the edgeCore window and present a button for each Action that you configured as well as attributes that were picked during setup. It will be up to the administrator who is creating the notification to generate a specific transform that would have only changes that they would like to see alerts raised for.