After maximizing the Script Center (![]() ) and loading the script (
) and loading the script (![]() ) you have previously recorded, you will see the following interface:
) you have previously recorded, you will see the following interface:
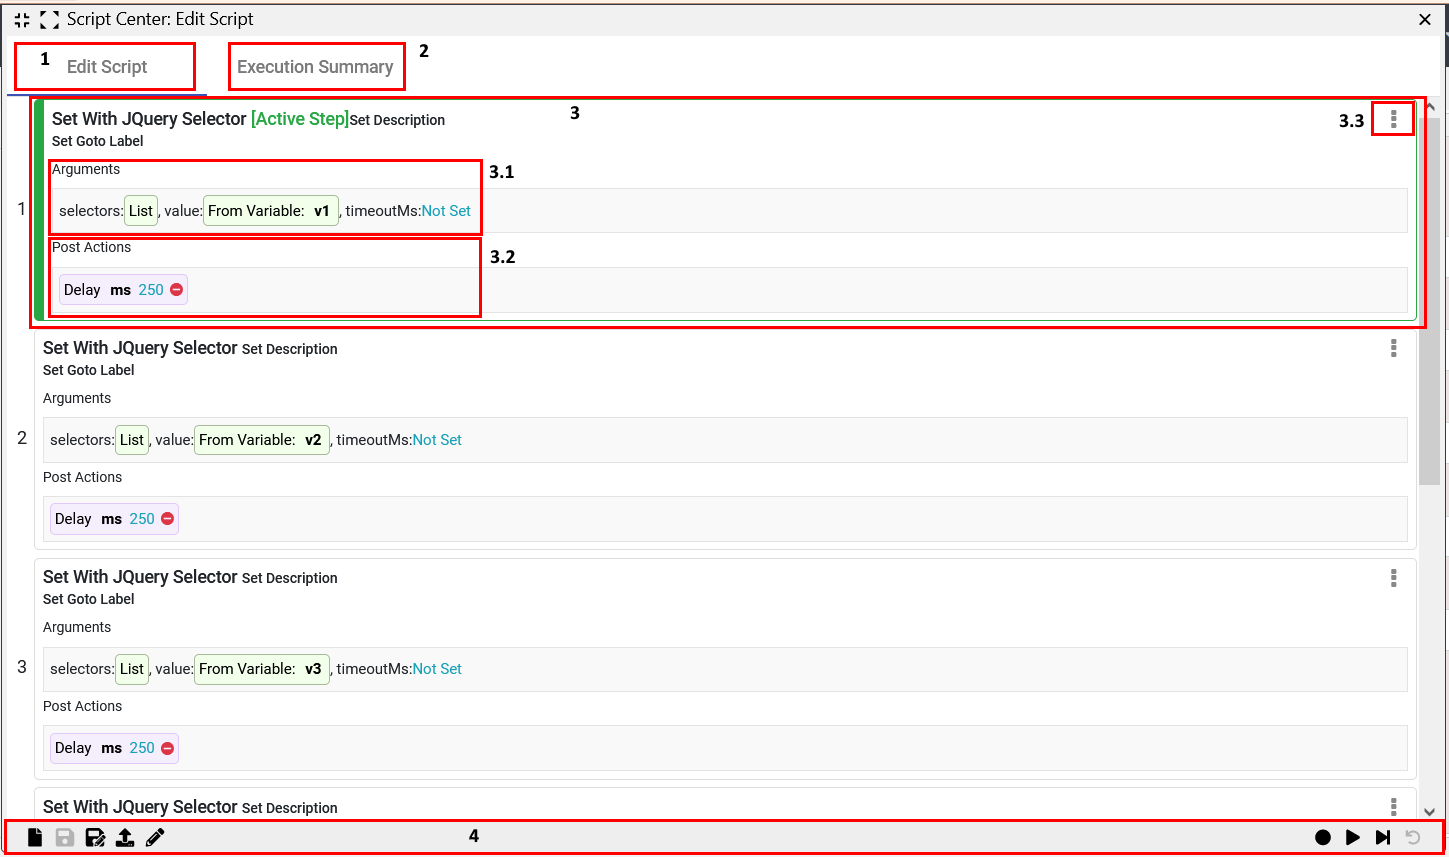
1 Edit Script
The Script Center consists of two tabs. The first tab (Edit Script) shows you the recorded steps of your script.
Steps are indexed and executed in the index order. You can stop the script execution at any moment and see the next step marked with a green border.
2 Execution Summary
The second tab of the Script Center shows the steps taken and the variables used in those steps.
If a script step fails, you will see the error on the screen and the error log within the execution summary for the failed step.
3 Step
The Step card represents a command that is recorded or added manually. It contains a type name, description, arguments, and post actions.
Not all commands contain or require arguments or post actions.
3.1 Arguments
Arguments contain variables that need to be passed to the command that is being executed. For example, a click command needs position information, button information, modifier information, and type information.
The arguments can be changed after the step is recorded by clicking on the variable value. Most of the variables can be set to a value, string, JavaScript Expression, or a different script variable.
timeoutMs: You can set the timeout for the selected step. This attribute is useful when a step might take some time to execute, so by increasing the timeout value, the step has a greater chance of running successfully.
3.2 Post Actions
After a command is executed, the post-action command takes place. The most common post action is Delay, and it is used when you need to wait for an element to appear for the action to be completed.
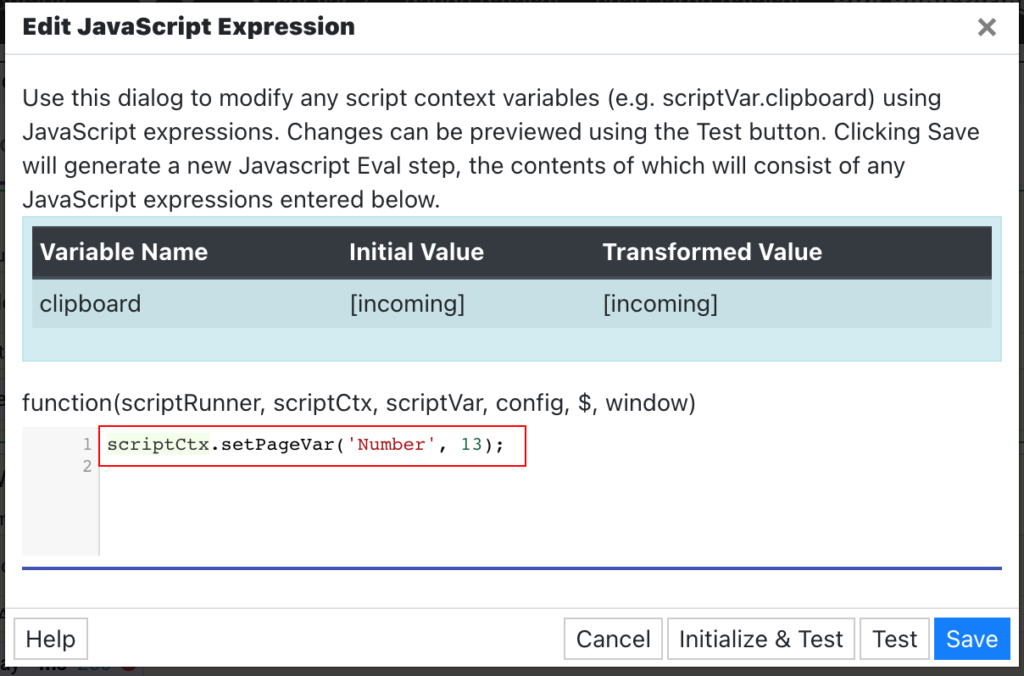
There is also Set Variable, which is used to modify a script variable during the script execution. You specify the variable name and its value as a value, string, result, JavaScript Expression, or a different script variable.
JavaScript Eval is used to run custom JavaScript commands and manipulate variables in a more advanced way using the full potential of JavaScript language.
All these post actions can be added through the Step options menu (3 dots).
3.3 Step Options
You can access the step options by clicking the three dots in the top-right corner or by right-clicking on the step. This menu contains many functions for manipulating the steps. For example, adding steps before or after the selected step, adding post actions, moving the step vertically in the list, and deleting the step.
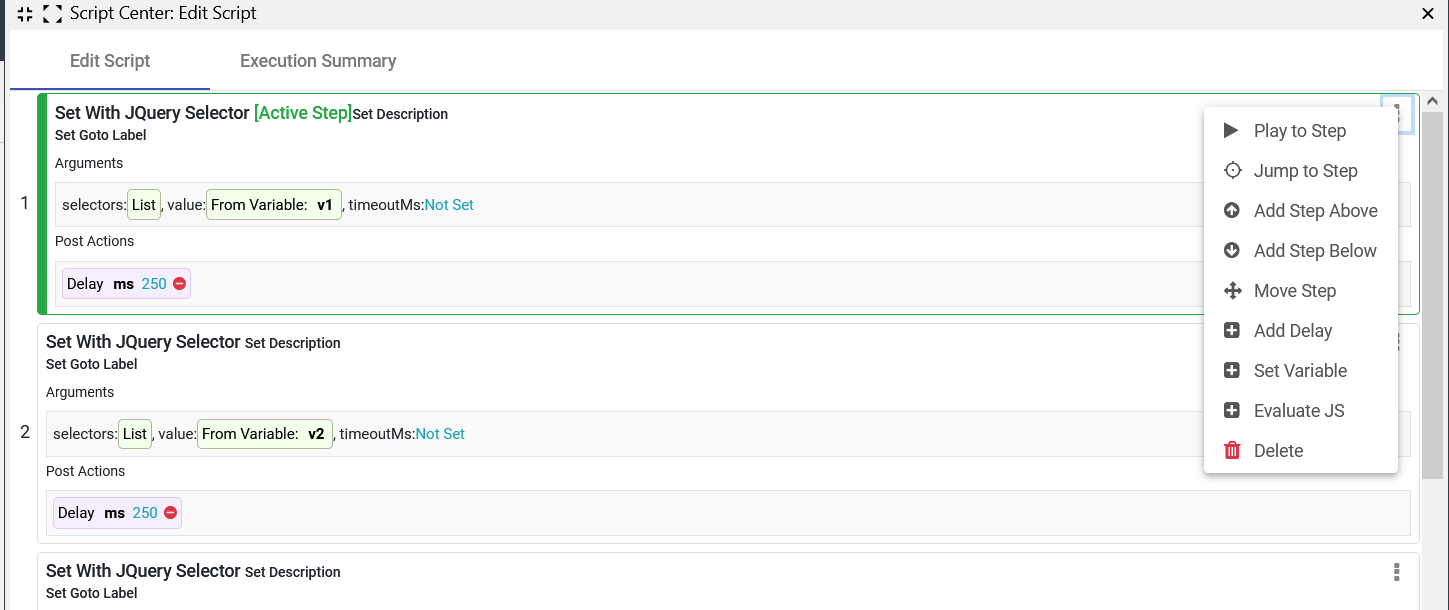
Available options are listed in the following table:
| Step Options | Description |
| Play to Step | Begins playing the script and stops at this step. It does not start playing from the beginning. |
| Jump to Step | Sets the active step to this step. Pressing play will begin the playback from this step to the script end. |
| Add Step Above | Manually insert a step above this step (refer to the list of available steps below). |
| Add Step Below | Manually insert a step below this step (refer to the list of available steps below). |
| Move Step | Using a dialog you can move a step up or down in the script. You can also use the mouse to drag steps into new positions by dragging the step by its number. |
| Add Delay | Inserts a delay to the script (will be disabled if already present); We can add delay to every action or it can be the action itself. It is suggested to add a 250ms delay to all actions except those that lead to page reloading and where it does not make sense. Delay should be used as a sort of protection due to the internet connection speed and speed of the website where we run the script. Another scenario is when something requires loading time, for example, filling the drop-down menu. In this case, we have to add delay to enable the server to load drop-down options. You can watch a short video here. |
| Set Variable | Change the value of a script variable for this step. |
| Evaluate JS | Add some custom Javascript to this step. Here you can use the scriptRunner function in two ways: – scriptRunner.nextStep = ‘3’ – use to set the next step to be executed based on the step number; – scriptRunner.nextStepLabel = ‘sectionHardware’; – use to set the next script step based on the GOTO label of the step; |
| Delete | Deletes the step. This action can not be undone. |
4 Script Control Bar
This element contains common features for creating, saving, managing and editing the script source code.
From this bar, you can also play back your recorded script. Before playing back your script, click Reset Playback so that the script plays from the beginning. Additionally, you can also replay step by step by using the Step button.
Available Steps
The following step types are available and can be added from the Script Center. You can see them in action in this video.
Simple action
This action does not have any specific role. It can be used as a placeholder for Javascript Expression, delay, or can contain a set variable function.
| Input | Output | Timeout |
| No | No | No |
Delay
Delay actions should be used to create time space between other actions. When we work with asynchronous actions e.g. fetching data, reloading page, or waiting for dropdown options to load we have to use the delay to prevent other steps to start before asynchronous action is finished.
Delay action accepts one argument:
– ms: the time, in milliseconds, that the step should wait before the next is executed;
| Input | Output | Timeout |
| ms (number) | No | No |
Javascript Eval
JavaScript Eval action is not connected with any element on the website. It is a pure step that can be used as a placeholder for the JavaScript expression.
Argument:
– evalExpr: JavaScript expression that allows writing custom JavaScript code;
| Input | Output | Timeout |
| evalExpr | No | No |
Set error handler
This action is in charge of handling server action errors. The parameter of this action is the goto label. When an error occurs, the script is going to jump to that step. This action can be useful in situations when a user wants to execute a set of actions that can generate errors.
Argument:
– handlerStepLabel: Goto label of the action which is going to execute after an error;
| Input | Output | Timeout |
| handlerStepLabel | No | No |
Goto Step
Go to step is used to jump to a specific script step before or after the current one.
Argument:
– stepLabel: Goto label of another element we want the script to jump to;
| Input | Output | Timeout |
| stepLabel | No | No |
Server action
Server action is a step that allows calling external API or executing SQL queries. This action can be used to save values in the database or send values to the external server.
Argument:
– serverAction: This value refers to the previously created action. Server actions can be created from the Database or Web Data connections.
| Input | Output | Timeout |
| serverAction | No | No |
Switch to page
Switch to page action allows the user to switch pages while running the script. This action has the possibility to send page variables from one page to another. To create this action, the user has to go through the configuration and select desired options.
| Input | Output | Timeout |
| actionConfig | No | No |
Get with JQuery selector
This action is used by pressing CTRL + C on the keyboard. After creating this action, we can choose the name of the variable where we want to keep that value.
Argument:
–selectors: list of JavaScript selectors required to find an element;
| Input | Output | Timeout |
| Selectors | Set variable | Yes |
Set with JQuery selector
This action is used by pressing CTRL + V into the selected input field. After creating this action, we can choose which value we want to pass to that input in the Script Center.
Arguments:
– selectors: list of JavaScript selectors required to find an element;
– value: value that is going to be passed to that element;
– dispatchEvent: JavaScript event that is going to be dispatched during this action;
| Input | Output | Timeout |
| Selectors, value, dispatchEvent | No | Yes |
Wait for element to load
This action waits for the selected element to be loaded and fully available on the page. It is useful when going to another page or loading a part of the page.
Arguments:
– selectors: list of JavaScript selectors required to find an element;
– errorStepLabel
| Input | Output | Timeout |
| Selectors,
errorStepLabel |
No | Yes |
Click with JQuery selector
This action is usually created from the recorder. In some situations, you cannot capture mouse click, so an alternative way to capture it is to navigate the pointer over the element you want to click and press the backtick key (key under the escape button on the keyboard).
Arguments:
– selectors: list of JavaScript selectors required to find an element;
– keyModifiers: list of key modifiers that can be dispatched during this action;
– dispatchEvent: JavaScript event that is going to be dispatched during this action;
| Input | Output | Timeout |
| Selectors,
keyModifiers, dispatchEvent |
No | Yes |
Keypress with JQuery element
This action sends a specific key code to the selected element.
Arguments:
– selectors: list of JavaScript selectors required to find an element;
– keyData: keycode the user has pressed;
– dispatchEvent: JavaScript event that is going to be dispatched during this action;
| Input | Output | Timeout |
| Selectors,
keyData, dispatchEvent |
No | Yes |
Get text from element
This action evaluates the selected element and saves its value. This action is usually created in the recorder.
Arguments:
– selectors: list of JavaScript selectors required to find an element;
Output:
– Set variable: Evaluated value will be stored in the selected script variable;
| Input | Output | Timeout |
| Selectors | Set variable | Yes |
Focus element
Focus element action is primarily used to send focus or blur Javascript events to the selected element. It is sometimes required to focus HTML elements in order to be able to modify them.
Arguments:
– selectors: list of JavaScript selectors required to find an element;
– dispatchEvent: JavaScript event that is going to be dispatched during this action;
| Input | Output | Timeout |
| Selectors | Set variable | Yes |
JS eval with element
This action provides a selected HTML element in the Javascript editor. After selecting the HTML element there are countless ways to use it.
Arguments:
– selectors: list of JavaScript selectors required to find an element;
– evalExpr: JavaScript expresion;
| Input | Output | Timeout |
| Selectors, evalExpr | No | Yes |
Citrix Steps
Mouse click
When captured or played in script, this step simulates a mouse click on X-Y coordinates of the Citrix window. Buttons are configurable.
| Arguments | Values | Description |
| button | Left, Middle and Right | Which button on the mouse to simulate |
| X, Y | 0-3840 | Coordinates |
| type | Single, Double and Triple | Button click count |
| modKeys | Alt/Option, Shift and Control | Additional key to send with mouse click |
| timeout | 0-100000ms | Time in ms after step will be timed-out |
Type text
Simulates typing text by sending keystrokes; Can take a script variable as input text.
| Arguments | Values | Description |
| text | Text, JS Expression, Script variable | Text that will be typed |
| timeout | 0-100000ms | Time in ms after step will be timed-out |
Type character
Sends a keypress event to the host machine in Citrix; Key type is configurable and so is the modifier key.
| Arguments | Values | Description |
| key | Key, JS Expression, Script variable | Key that will be pressed |
| modKeys | Alt/Option, Shift and Control | Additional key to send with mouse click |
| timeout | 0-100000ms | Time in ms after step will be timed-out |
Mouse wheel
Sends mouse wheel events to the Citrix window. Amount of lines and direction is configurable.
| Arguments | Values | Description |
| X, Y | 0-3840 | Coordinates |
| amount | 0-10000 | Amount of lines |
| modKeys | Alt/Option, Shift and Control | Additional key to send with mouse click |
| timeout | 0-100000ms | Time in ms after step will be timed-out |
Copy remote clipboard
If the Citrix user has permission, this step will get the contents of the host machine clipboard and store it as script variable.
| Arguments | Values | Description |
| timeout | 0-100000ms | Time in ms after step will be timed-out |
Post actions:
Set variable [value] from result
Get image location
Returns the X and Y position of the selected image within the Citrix window and stores values as script variables.
| Arguments | Values | Description |
| image | image | Representation of the image |
| confidence | 0-1 | Percentage of the pixels that has to be the same in the picture and in citrix |
| continueIfNotFound | Boolean | Should the script continue if image is not found |
| timeout | 0-100000ms | Time in ms after step will be timed-out |
Wait for image
Allows script to wait for a defined amount of time, until a predefined image/element is visible in the Citrix window.
| Arguments | Values | Description |
| image | image | Representation of the image |
| confidence | 0-1 | Percentage of the pixels that has to be the same in the picture and in citrix |
| timeout | 0-100000ms | Time in ms after step will be timed-out |
Set mouse anchor on image
Selects an area or element within the Citrix window, which when found, is used as an anchor point for mouse click XY coordinate start 0,0.
| Arguments | Values | Description |
| image | image | Representation of the image |
| confidence | 0-1 | Percentage of the pixels that has to be the same in the picture and in citrix |
| timeout | 0-100000ms | Time in ms after step will be timed-out |
Clear mouse anchor position
Resets the previously set mouse anchor to 0,0 of the top-left corner of the Citrix window.
| Arguments | Values | Description |
| image | image | Representation of the image |
| confidence | 0-1 | Percentage of the pixels that has to be the same in the picture and in citrix |
| timeout | 0-100000ms | Time in ms after step will be timed-out |
Get text from image
Performs OCR function to extract text from a defined screen area. Extracted text is stored as a script variable.
| Arguments | Values | Description |
| X, Y | 0-3840 | Coordinates |
| Width, height | 0-10000 | Width and height of the image to extract from |
| timeout | 0-100000ms | Time in ms after step will be timed-out |
Disabling Steps
edgeCore version: 4.4.1
When you load the recorded script, you can disable any step by turning off the toggle switch. This is useful for testing different versions of the steps.
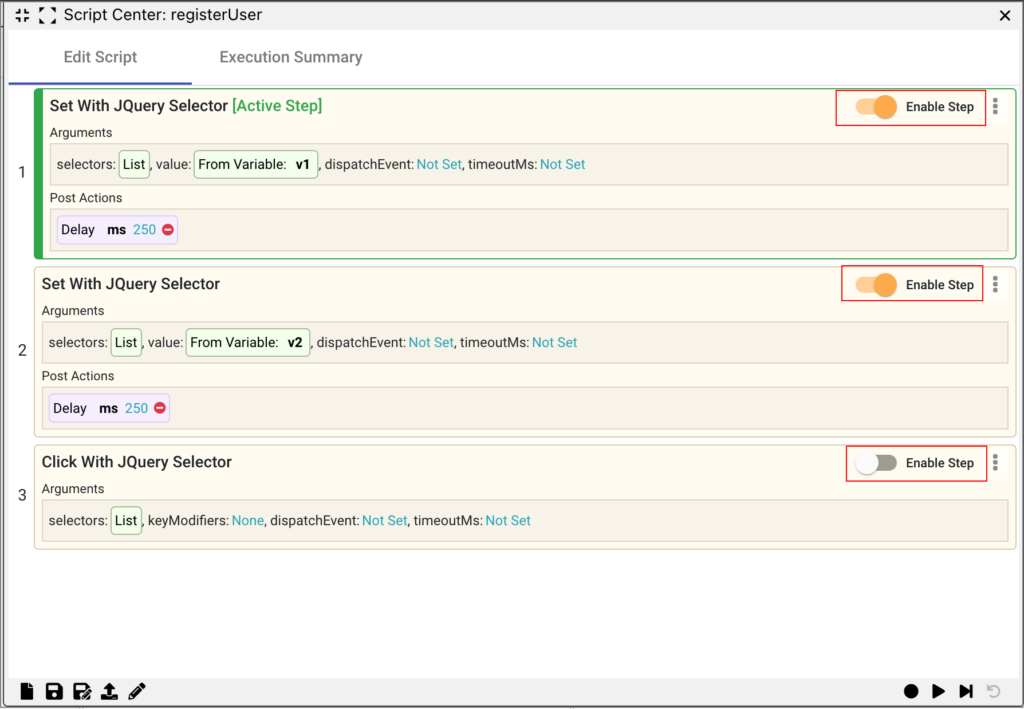
For example, in this video, we have disabled the last step in our script — click on the Register button to submit user information.