The HTML Template Visualization is an advanced visualization geared towards software engineers. On the surface, this visualization allows HTML and CSS to be combined to create custom visualizations. However, the HTML Template Visualization does not have to be static. Like all visualizations, an HTML Template Visualization has a data set. Beneath the covers, the HTML Template Visualization supports JavaScript and Angular. This combination of Angular, JavaScript, HTML, and CSS provides a powerful set of tools to build up truly custom visualizations.
Renderer: HTML Tab
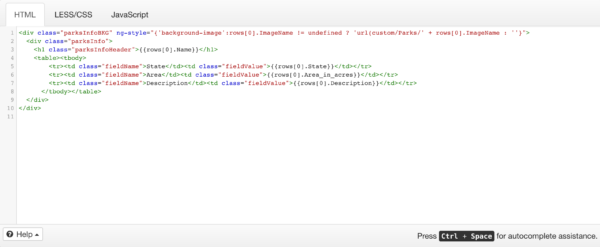
The HTML tab allows administrators to type HTML. It supports Angular statements which can be used for data binding. The “ng-style” tag shown below swaps out a background image based on the value of an edgeCore Page Variable.
LESS/CSS
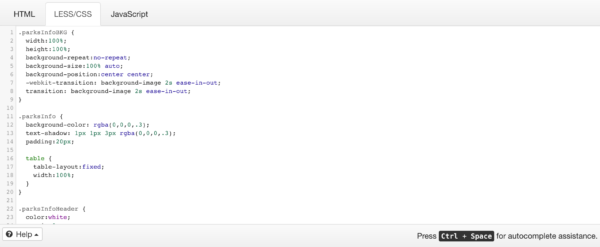
The LESS/CSS tab allows administrators to create custom LESS/CSS classes, which can then be referenced on the HTML tab.
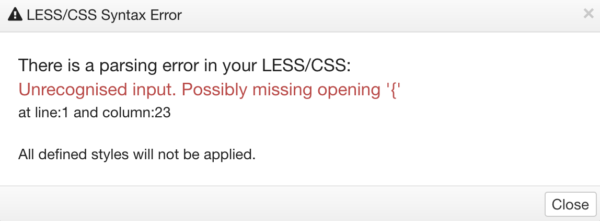
The HTML Template’s configuration will detect certain syntax errors within the source code and prevent malformed LESS/CSS from getting to the client and causing problems.
Note:
Avoid using inline CSS within the HTML tab, as the css rules will apply to the entire application, not only the body of the HTML Visualization.
CSS rules written in the LESS/CSS tab will have a unique widget ID appended to them, and will apply only to the elements whithin the HTML Visualzation.
JavaScript
The JavaScript tab allows an administrator to write JavaScript, which can then be referenced on the HTML tab.
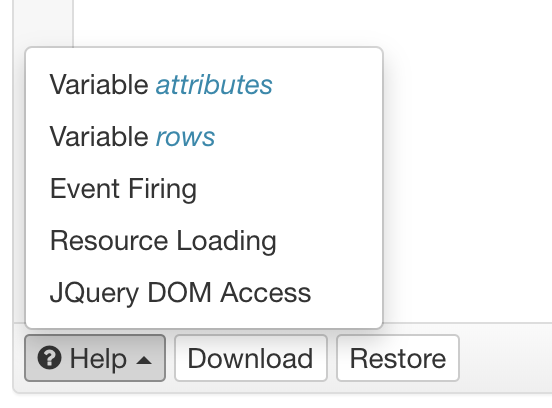
Detailed Developer Help is offered in the footer, with examples on how to work with variables, events, and resource loading.
As of 4.3.0, ES6 Javascript is supported.
Please note that ES6 has strict type-checking, and undeclared variables will cause a runtime exception, so you should check the Web Console.
Downloading and Restoring
This feature is available in edgeCore v3.5.3 or higher.
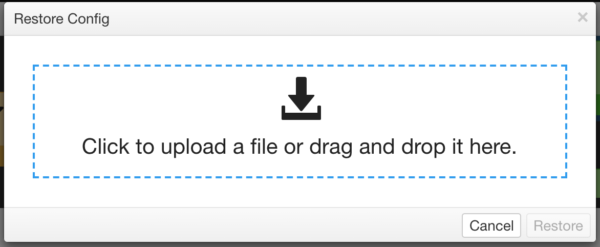
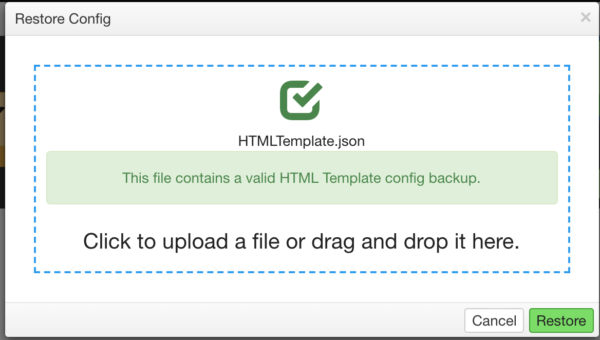
Clicking Download on the Renderer Wizard Step will produce a backup file of the Custom HTML Template for easy reuse. Restoring it provides a dialog that allows you to Drag-and-drop or choose a backup file.
Partial Backup
To ensure all dependencies are included in partial backups, either place referenced static resources in [INSTALL_HOME]/static-web/visualizations/{visualizationName} (note the camel-casing of the visualization’s name), or choose your own location and specify it in the Resources Location property in the Configure step of the HTML Template Wizard. Any location specified should be under the [INSTALL_HOME]/static-web directory, which maps to /custom for URLs in the HTML Template.
EdgeCore 4.1+ Changes
When using partial backup, to have your files and resources backed up with the visualization, you can set “Resources Location” parameter in the Visualization edit dialog to the directory that contains those resources, (must be within static-web)
For example, if your file.js is located in “[INSTALL DIRECTORY]/static-web/custom/js/file.js” , set “Resources Location” to “custom/js/”
To access and load external resources, such as images, js or css files, into your HTML Visualization, use the JS tab within the renderer, and call one the functions:
- loadResource(url) //url is a string that can be relative or fully qualified (as in a CDN)
- loadResources(urls[ ]) //urls is an array of strings
When using resources that need to be stored localy, place the files insde the “static-web” directory.
Example: file.js is located at “[INSTALL DIRECTORY]/static-web/myVisualization/js/file.js”
use the following function:
component.loadResource(‘/custom/myVisualization/js/file.js’)
or if you have multiple files:
component.loadResources([‘/custom/myVisualization/js/file.js’,’/custom/myVisualization/js/file2.css’])
NOTE: Make sure that you include the "/custom/" before the directory name within "static-web".
Externally loaded variables or functions contained files are only accesible through window.object.
Example:
file.js has a variable ‘var amount=10’ ,
when file.js is loaded using component.loadResource(),
you can access the amount variable in JavaScript tab by
“var amount = window.amount”
NOTE: Be very careful when loading CSS files using this function, as the CSS is applied to the entire webpage.
Example: if you load the file2.css and it contains “body{background:blue}”, the rule will apply to the body of the entire Edge application, not only the body of the HTML Visualization.
HTML Visualizations – Basic Guide:
To fully utilize the flow of data and visualization flexibility of this type of visualizations, It’s recommended to have basic knowledge of HTML, CSS, Javascript and Angular.
Data coming from the feed is stored in a variable called $rows in the form of objects array.
The simplest way to display feed data is:
<div *ngFor="let row of rows$ | async">

    {{row | json}}

</div>
The {{row}} is an object that contains values for each attribute of the dataset.
In this guide, we will use the dataset provided with edgeCore, located in
#root/data/getting_started/state_counties.csv
The above mentioned piece of HTML will display this:
This representation of data is useful for checking if all data is available to visualization and noting the data types.
If we want to get a list of values of specific attribute, just select the attribute from the object, like in the following example:
<div *ngFor="let row of rows$ | async">

  <p><strong> {{row.County_STRING_PK | json}}</strong> is in <strong>{{row.State_STRING | json}}</strong> and the number is <strong>{{row.LastYearSales_NUMBER | json}}</strong></p>

</div>
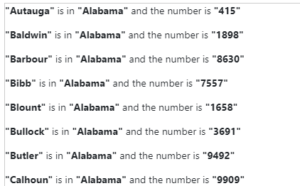
As you can see, we can place output values anywhere within the ngFor=”let row of rows$.
Additionally, you can display the output data in different formats, using an angular built in pipe function.
<p>The hero’s birthday is {{ birthday | date:”MM/dd/yy” }} </p>
- To make the preview more stylish, results can be styled using LESS/CSS.
HTML:
<div id="pageContainer">
<div class="resultItem" *ngFor="let row of rows$ | async">
<strong> {{row.County_STRING_PK | json}}</strong> is in <strong>{{row.State_STRING | json}}</strong> and the number is <strong>{{row.LastYearSales_NUMBER | json}}</strong>
</div>
</div>
LESS/CSS:
#pageContainer{

  display:block;

  width:100%;

  height:100%;

  overflow:auto;

}


.resultItem{

  display:block;

  width:max-content;

  height:auto;

  border-radius:5px;

  padding:10px;

  box-shadow:0px 0px 3px gray;

  margin:2em;

  transition:all 0.5s;

}


.resultItem:hover{

  cursor:pointer;

  background-color:lightgray;

}
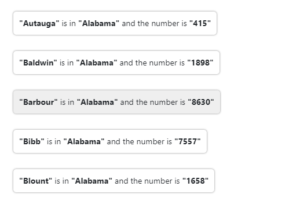
NOTE: styles defined in the LESS/CSS tab will not influence any element outside the visualization, including elements that can be dynamically loaded (from iframes). All element styles defined in LESS/CSS Tab will have a unique ID appended to them to avoid colliding with existing classes.
Action triggers:
To fully utilize the data objects inside the visualization, an action trigger can be added to elements. Like in other visualizations, a click row and hover events are available. Example:
<div id="pageContainer">

    <div class="resultItem"

     (click)="fireRowClickEvent(row)"

     (mouseenter)="fireRowHoverEvent(row)"

     (mouseleave)="fireRowHoverEvent()"

     *ngFor="let row of rows$ | async">

      <strong> {{row.County_STRING_PK | json}}</strong> is in <strong>{{row.State_STRING | json}}</strong> and the number is <strong>{{row.LastYearSales_NUMBER | json}}</strong>

</div>
</div>
By adding the following attributes to specific elements, angular events are able to trigger actions defined in widget actions.
- (click)=”fireRowClickEvent(row)”
- (mouseenter)=”fireRowHoverEvent(row)”
- (mouseleave)=”fireRowHoverEvent()”
Example of set actions:
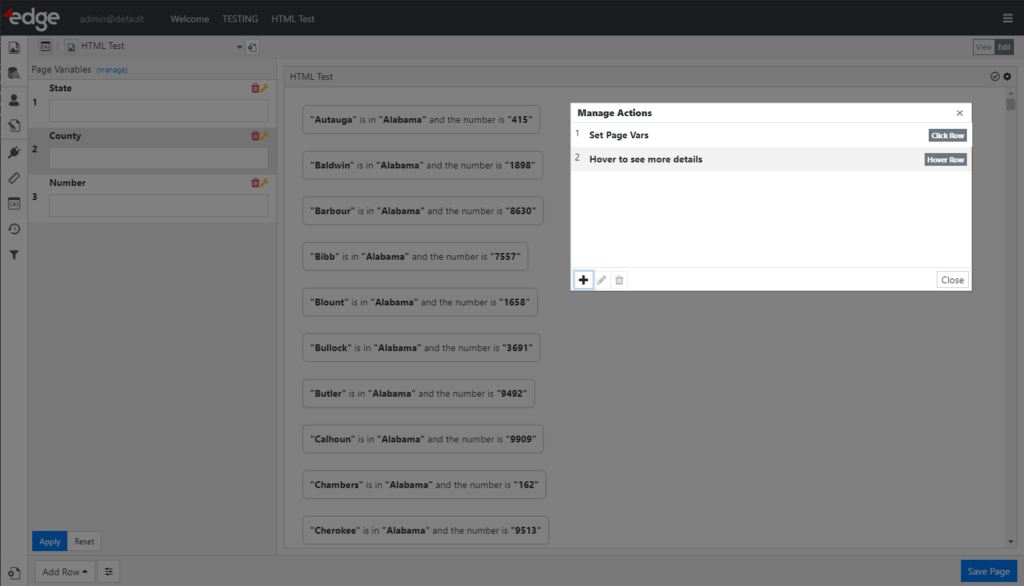
Click action:
-Page vars are set to values contained in the clicked element.

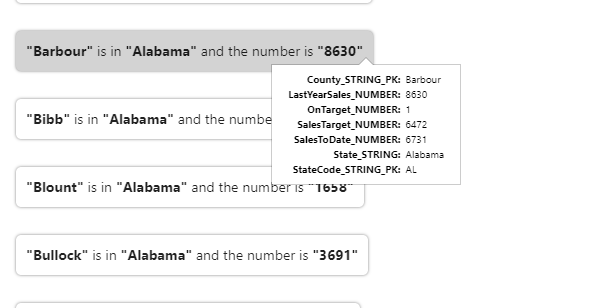
Hover row:
-Can be set to display other values from the “row” object
Handling page variables from HTML Visualizations:
The flexibility of using custom JS code inside visualizations, allows user to get and set page variables, which can be used in server actions and further queries.
- $scope.getPageVar(‘varname’); – will return the value of page var named ‘varname’;
- $scope.getPageVars(); – will return an array of objects containing all page variables and variable name pairs.
- $scope.setPageVar(‘varname’, ‘Hello’); – will set page variable named ‘varname’ to value ‘Hello’.
Tips:
You can map variables for easier handling of the script
var values = $scope.getPageVars().map(t => t.value);
Using a page variable in combination with rules, you can set multiple different actions to click events, which would trigger based on the rules defined. For example, In HTML Visualization, make a dropdown that lets you select 5 different values, and setting that value, changes the page var. After selecting dropdown, bind click action to a button. Make multiple click actions with rules that apply to the page var you previously set.
Loading external resources – Angular sanitation issue:
Due to Angulars XSS Prevention mechanism, When using external links, you may have access to those resources blocked. To prevent this from happening, you need to add that address to a list of trusted url’s by piping it to trustResourceUrl. Here’s an example:
<iframe id="externalResource" width="100%" height="100%"

frameborder="0"

 [src]="externalURL | trustResourceUrl" >

</iframe>
More information on XSS Sanitation can be found here.
Page variable change – responsive HTML Visualizations:
$watchCollection function can be used to monitor page variables from within HTML Visualization, and react to changes of the variables. Example of code from JS tab:
$scope.$watchCollection(function (scope) {


        var values = $scope.getPageVars().map(t => t.value);

        return values


    },

    function (newValues, oldValues, scope) {


        if (newValues !== oldValues) {


            var val1 = newValues[0];

            var val2 = newValues[1];

            var val3 = newValues[2];

            var val4 = newValues[3];


            console.log("Page vars have changed, new values are:")

            console.log(val1 + "-" + val2 + "-" + val3 + "-" + val4);


        }

    }

);
Example
The HTML, Angular, and CSS shown in the examples above combine to create the examples below. It is a fairly simplistic visualization, but thanks to Angular, it is interactive and will react to Page Variables. The visualization will show a background image and text values based on the value of a Page Variable, which in this case is the name of a National Park.
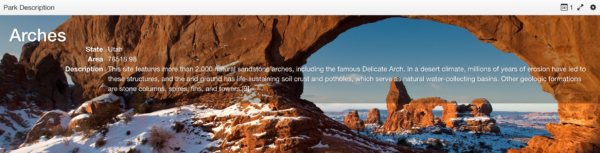
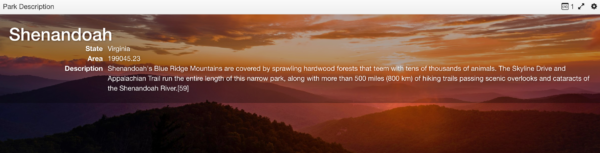
Sample Data
Click here to download the National Parks data referenced on this page: National Parks Data Files
Using a JavaScript library that is provided by edgeCore
Some of the common libraries are available off the window object and can be used directly:
- moment
- $ or jQuery
- go (gojs)
- L (leaflet)
- d3
- _ (underscore)
Using a JavaScript library that is conflicting with the version provided by edgeCore
If you wish to use a JavaScript library that is already in edgeCore but at a newer or older version, you can accomplish this by using an iframe to compose your content and import your CSS and JavaScript library files. We have created an example of this with the following edgeCore v3.6 partial archive: HTMLTemplate.esb.
EdgeCore 4.x Version
Dataset Access
There are a few ways to access data from the pipeline:
component.rows: any[];
component.rows$: Observable<any[]>;
component.onDataChanged();
Javascript Example
// subscribe to dataset changes
const mySubscription = component.rows$.subscribe(rows => {
    for (const row of rows) {
       console.log(row);
       // do stuff
    }
});
// *** VERY IMPORTANT TO AVOID MEMORY LEAKS ***
component.onDestroy = () => {
    mySubscription.unsubscribe();
};

// alternative way to listen to changes in data
component.onDataChanged = (rows) => {
    console.log(rows[0]);
};
HTML Example
<div *ngFor="let row of rows">
    {{row | json}}
</div>
    <!-- or to use Observable -->
<div *ngFor="let row of rows$ | async">
    {{row | json}}
</div>
Dataset Attributes
There are two ways to access attributes from the attached dataset. Attributes are the names of the columns inside the dataset rows.
component.attributes: any[];
component.attributes$: Observable<any[]>;
Javascript Example
// subscribe to attribute changes
const mySubscription = component.attributes.subscribe(attributes => {
    for (const attr of attributes) {
       console.log(attr);
       // do stuff
    }
});
// *** VERY IMPORTANT TO AVOID MEMORY LEAKS ***
component.onDestroy = () => {
    mySubscription.unsubscribe();
};
HTML Example
<div *ngFor="let attr of attributes">
    {{attr | json}}
</div>
    <!-- or to use the Observable -->
<div *ngFor="let attr of attributes$ | async">
    {{attr | json}}
</div>
HTML DOM Access
There are a few convenience variables off the component that can be useful when doing JQuery DOM access.
component.widgetID //the unique DOM ID of the HTML Template widget container
component.containerElement //the JQuery Object of the widget container
Javascript Example
// the HTML Example shows how to use widgetID to uniquely ID individual DOM elements
// this example shows how you could then access it
const myCoolDivSelector = '#' + component.widgetID + '_myCoolDiv';
$(myCoolDivSelector).css('background-color', 'red');

// use the containerElement to programmatically add new DOM nodes, or create a more efficient
// selector for finding DOM nodes
component.containerElement.find('.someClass');
HTML Example
<input [name]="widgetID + '_myCoolDiv'" [(ngModel)]="myCoolVar">
    <!-- You can use the widgetID to give unique ID's or Names to your DOM nodes to avoid id/name collision when
     having multiple instances of your HTML Template widget on the same page →
Event/Action Firing
Use the following scope functions to send events that can be wired up to actions.
fireRowClickEvent(row, attributeName, attributeValue) //attributeName and attributeValue are optional
fireAttributeClickEvent(attributeName, attributeValue)
fireRowHoverEvent(row)
Javascript Example
// define a function on the Javascript tab to be called by the HTML with (click)
// allows you to process the click prior to firing the action
component.rowClicked = (row) => {
    if (row !== undefined) {
        component.fireRowClickEvent(row);
    }
};
HTML Example
<!-- fireRowClickEvent with row only -->
<div *ngFor="let row of rows"
     (click)="fireRowClickEvent(row)">{{row.myCoolAttribute}}</div>
<!-- fireRowClickEvent with attribute context -->
<div *ngFor="let attr of attributes"
     (click)="fireRowClickEvent(rows[0], attr, rows[0].attr)">
    {{rows[0].attr}}
</div>
<!-- fireRowHoverEvent -->
<div *ngFor="let row of rows"
     (mouseenter)="fireRowHoverEvent(row)"
     (mouseleave)="fireRowHoverEvent()">{{row.myCoolAttribute}}</div>
Loading Resources
Use either of the following functions to load external Javascript and/or CSS into your custom visualization.
loadResource(url) //url is a string that can be relative or fully qualified (as in a CDN)
loadResources(urls[ ]) //urls is an array of strings
Javascript Example
function init(){
    component.loadResources(['custom/js/myCoolJavascript.js',
        'custom/js/myCoolCSS.css']).then(() => {
            console.log('resources have been loaded and can now be used');
            // Please note, the then() function will be called every time the visualization
            // is initialized, despite if the script has previously been loaded.
    });
}
// ... any additional javascript or functions ...
init();
Page Variable Access
Use the following APIs to access or change Page Variable values.
getPageVars() // get all the page variables and their current values
pageVars$ // Observable<any[]>;
setPageVar(name: string, value: any) // set the value of a specific page variable
setPageVars(vars: {[key: string]: any})  // set multiple page variables
Javascript Example
const pageVarSub = component.pageVars$.subscribe(pageVars => {
  // do something with the new page variable values
  console.log('page variables changed...');
  console.log(pageVars);
  // if you change any variable that has an HTML binding you will need to call the following
  component.changeDetectorRef.detectChanges();
});
component.onDestroy = () => {
  console.log('html template widget destroyed');
  // unsubscribe from page variable changes to avoid leaking memory
  pageVarSub.unsubscribe();
};

function exampleSetPageVars() {
  component.setPageVars({ myPageVar: 'someCoolValue', anotherPageVar: 'anotherValue'});
}
HTML Example
<div>{{getPageVars() | json}}</div>
Migrating from Angular 1.x or edgeCore 3.11
Beginning with edgeCore version 4.0, the HTML Template widget is built using the latest versions of Angular, which has breaking API and syntax changes from AngularJS 1.x. The following tips and hints can help in learning the differences when migrating from those earlier edgeCore versions.
$scope
$scopeis nowcomponent
Prior to version 4.0, you would place properties and functions on the $scope object to be accessed in your HTML;
Now you use the component reference;-
$scope.myData = ['a', 'b', 'c'];
now becomes
component.myData = ['a', 'b', 'c'];
-
$scope.onElementClick = () => { console.log('element clicked'); }now becomes
component.onElementClick = () => { console.log('element clicked'); }
ngRepeat
ngRepeatis now*ngFor-
<div ngRepeat="item in myData">{{item}}</div>now becomes
<div *ngFor="let item of myData">{{item}}</div>For more
*ngForexamples, refer to this page.
ngIf
ngIfis now*ngIf-
<div ngIf="someBooleanProperty">Hello World</div>
now becomes
<div *ngIf="someBooleanProperty">Hello World</div>
-
<div ngIf="property > 5">Hello World</div>
now becomes
<div *ngIf="property > 5">Hello World</div>
For more
*ngIfexamples, refer to this page.
ngClick
ngClickis now(click)-
<div ngClick="onElementClick($event)">Click Me!</div>
now becomes
<div (click)="onElementClick($event)">Click Me!</div>
For more
(click)examples, refer to this page.
ngModel
ngModelis now[(ngModel)]-
<input type="text" name="myInput" ngModel="somePropertyOnScope">
now becomes
<input type="text" name="myInput" [(ngModel)]="somePropertyOnComponent">
For more
[(ngModel)]examples, refer to this page.
Lint Checks
edgeCore version: 4.3.6
In both the HTML and JavaScript editors, you are immediately warned about unsupported syntax, stylistic errors, and suspicious constructs so that you can identify and correct issues with the structural quality of your code.

Adding Custom Angular Cell Templates to the AG Grid
edgeCore version: 4.3.6
To add a custom cell template to the AG Grid, you need to define columns in the HTML editor (see the example), not in JavaScript.
Example
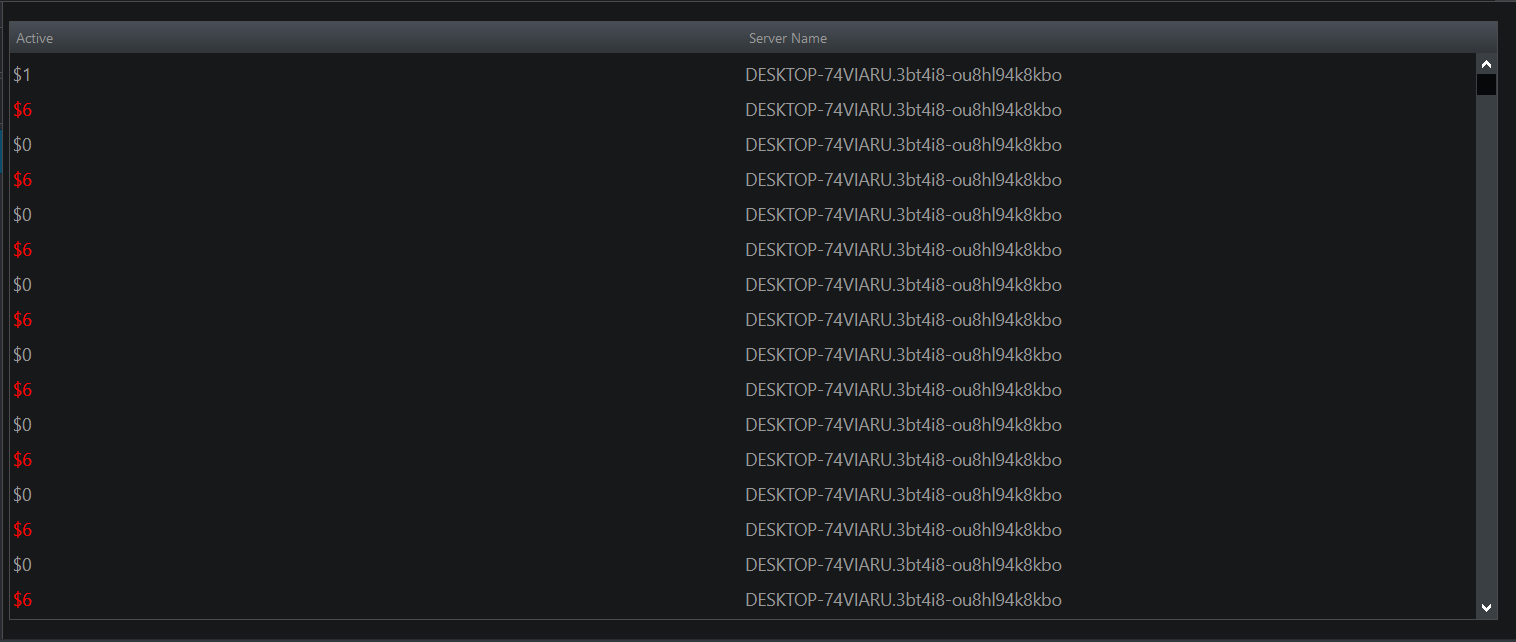
We want to create an HTML template visualization off of the entitlement report, and we want to show only two columns: active and serverName. Also, we want the rows where active is greater than 1 to be highlighted in red.
In the HTML editor, we will enter the following:
<ag-grid-angular
   class="ag-theme-alpine"
   edgeAgGridAdminTable
   [rowData]="rows$ | async"
   [columnDefs]="coldefs">
  <ag-grid-column
                  field="active"
                  headerName="Active"
                  [cellRendererFramework]="AgGridCellTemplateComponent"
                  [cellRendererParams]="{ngTemplate: activeTpl}">
    <ng-template #activeTpl let-row="params.data">
      <span [ngClass]="{'high': row.active > 1}">${{row.active}}</span>
    </ng-template>
  </ag-grid-column>
  <ag-grid-column
                  field="serverName"
                  headerName="Server Name">
  </ag-grid-column>
</ag-grid-angular>
and the following in the LESS/CSS editor:
.high{color:red}
We get the following result:
Creating and Running the Tooltip Action Directly from the HTML Template
edgeCore version: 4.3.6
To create and run the Tooltip action directly from the HTML template, enter the following in the HTML editor:
<button class="btn btn-primary" (mouseover)="showTooltip('any description you want')" (mouseout)="hideTooltip()">name of the button</button>
Example
In the HTML editor, we will enter the following:
<div class="alert alert-success">To test the Tooltip action, hover over the corresponding button:</div>
  <div class="controlForm">
      <button class="btn btn-primary" (mouseover)="showTooltip('This is a simple tooltip')" (mouseout)="hideTooltip()">My Tooltip</button>
</div>
The result is as follows:

Creating and Running the Copy to Clipboard Action Directly from the HTML Template
edgeCore version: 4.3.6
To create and run the Copy to Clipboard action directly from the HTML template, enter the following in the HTML editor:
<button class="btn btn-primary" (click)="copyTextToClipboard('text you want to copy')">Copy 'text you want to copy' to Clipboard</button>
Example
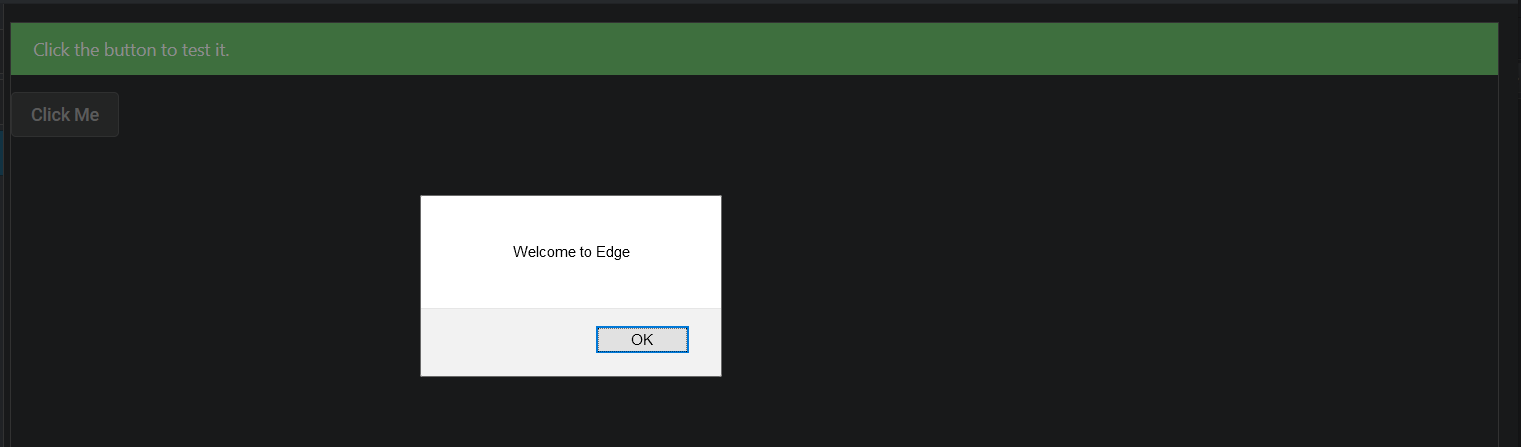
In the HTML editor, we will enter the following:
<div class="alert alert-success">To test the Copy to Clipboard action, click the corresponding button:</div>
  <div class="controlForm">
      <button class="btn btn-primary" (click)="copyTextToClipboard('Welcome to Edge')">Copy 'Welcome to Edge' to Clipboard</button>
  </div>
The result is as follows:

Creating and Running the Switch to Page Action Directly from the HTML Template
edgeCore version: 4.3.6
To create and run the Switch to Page action directly from the HTML template, do the following:
- In Renderer, click Code Snippets in the bottom left corner.
A pop-up with available snippets is displayed.
- Find Switch To Page and click Insert Snippet.
A pop-up for choosing a page is displayed. - Select a page from the dropdown.
A button will be created to switch to the selected page. - Click Use Selected Page.
Both the HTML and JavaScript editors are automatically populated. - Click Next.
You are taken to the Preview tab, where you can view the Switch to Page button. - Click Save and Close.
- Find the page containing this HTML template visualization (or add this visualization to a page if you have not done it). Click the displayed Switch to Page button to go to the page you selected in step 3.
Inserting Code Snippets into HTML Template
edgeCore version: 4.3.6
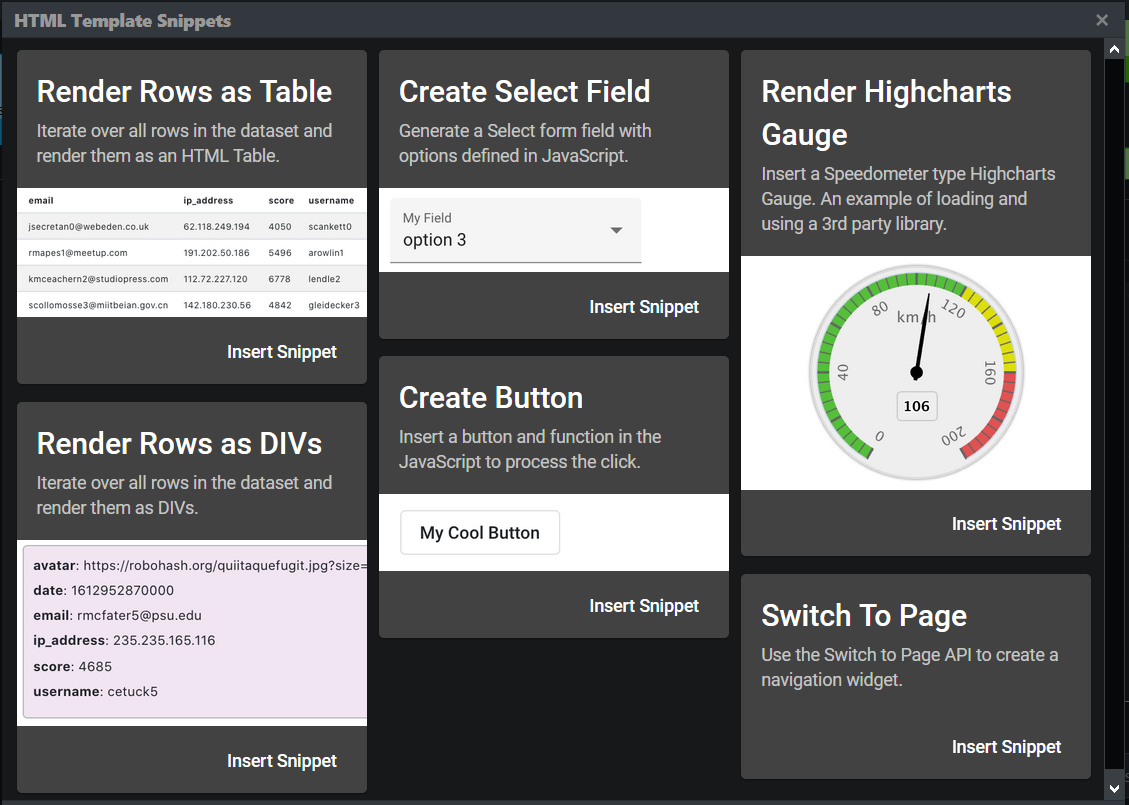
You can import the following snippets that will:
- render rows as table
- render rows as DIVs
- generate a Select form field
- insert a button to process the click
- insert a speedometer gauge
- perform the Switch to Page action
- call a server action via JavaScript (introduced in 4.3.7)
To import code snippets, do the following:
- In Renderer, click Code Snippets in the bottom left corner.
A pop-up with available snippets is displayed.
- Find the snippet you want and click Insert Snippet.
Snippet Examples
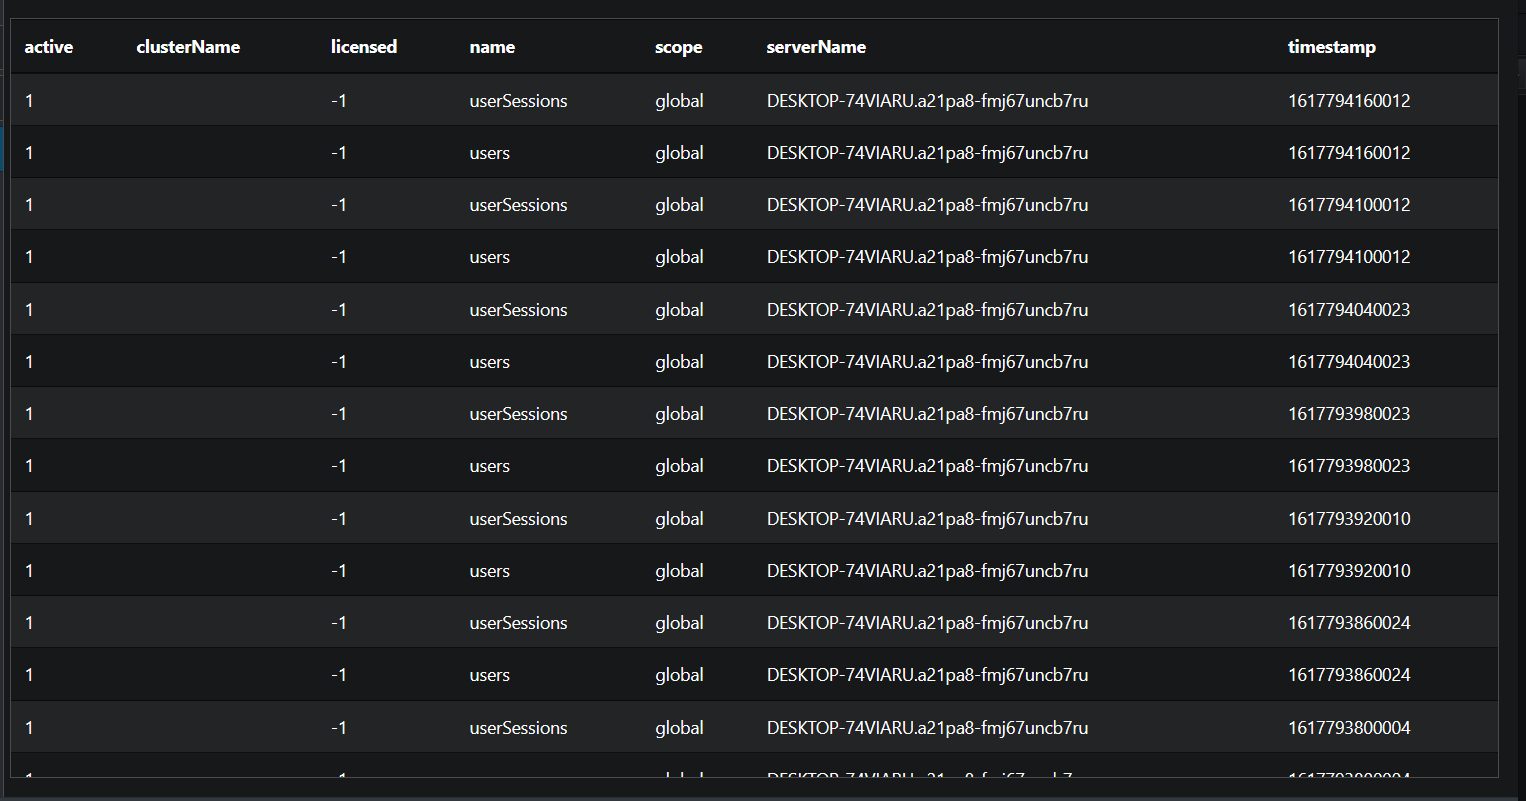
Render Rows as Table Snippet
This snippet iterates over all rows in the dataset and renders them as an HTML table.
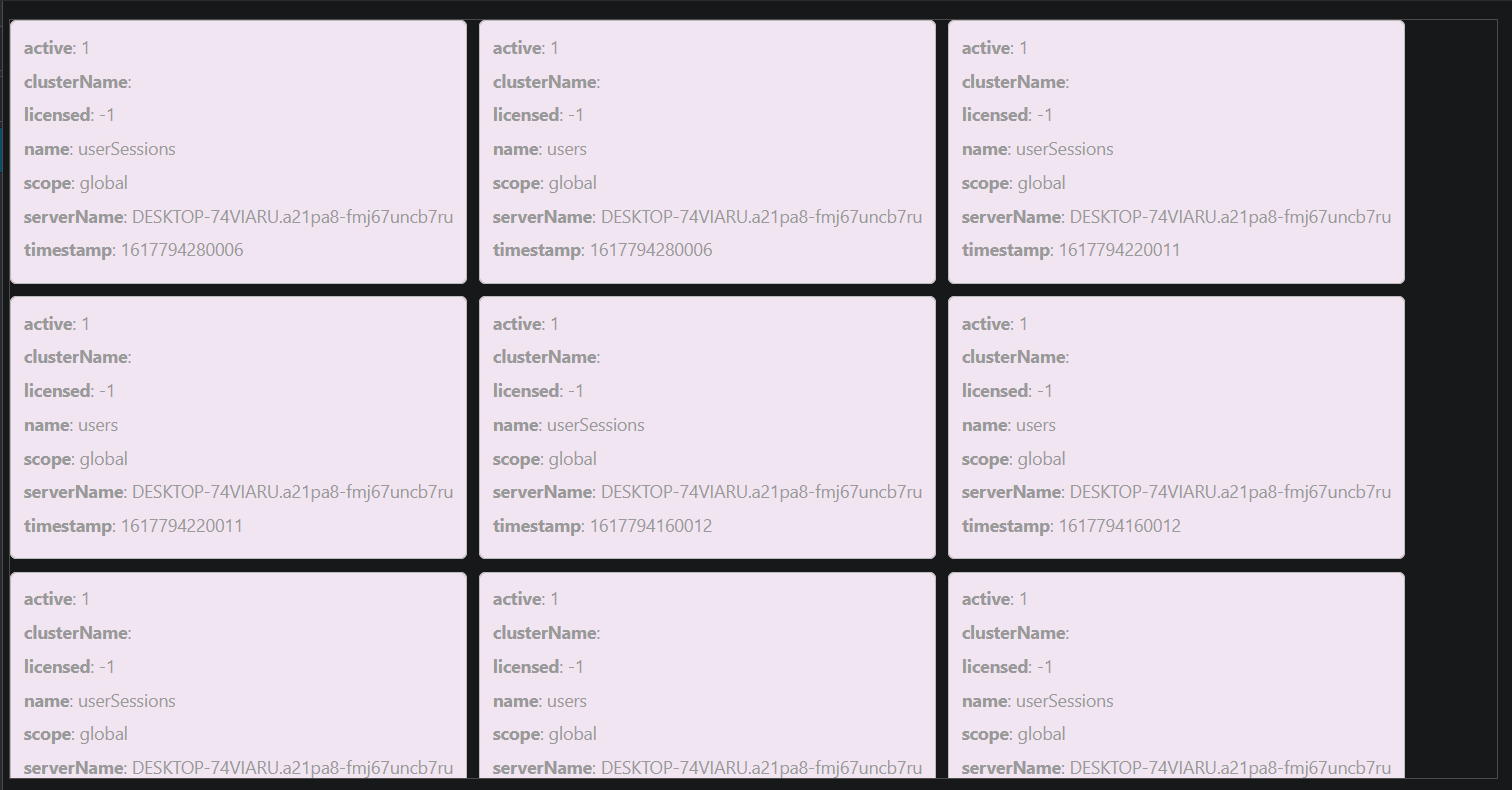
Render Rows as DIVs Snippet
This snippet iterates over all rows in the dataset and renders them as DIVs.
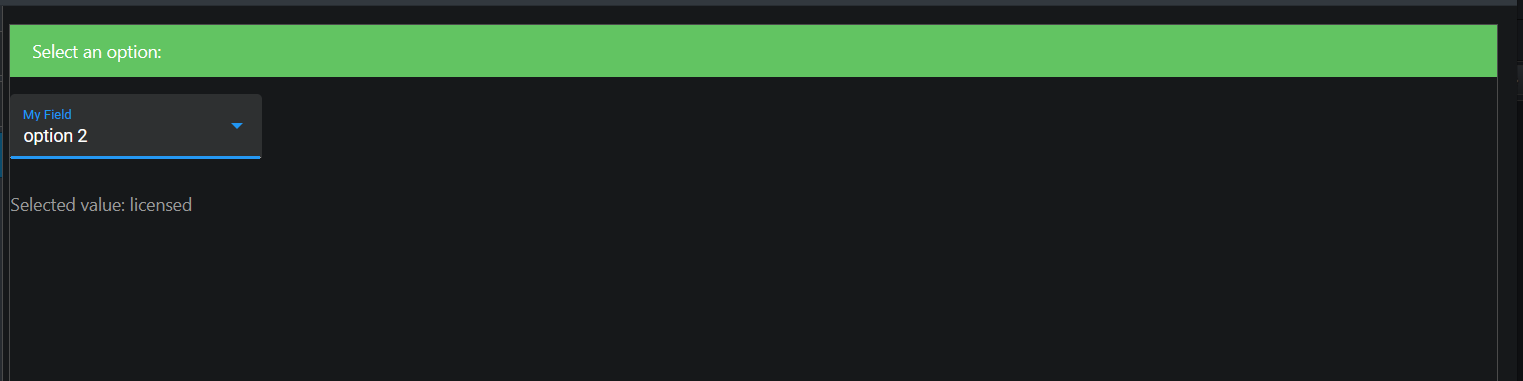
Create a Select Field Snippet
This snippet generates a Select form field with options defined in JavaScript.
Create a Button Snippet
This snippet inserts a button and function in JavaScript to process the click.
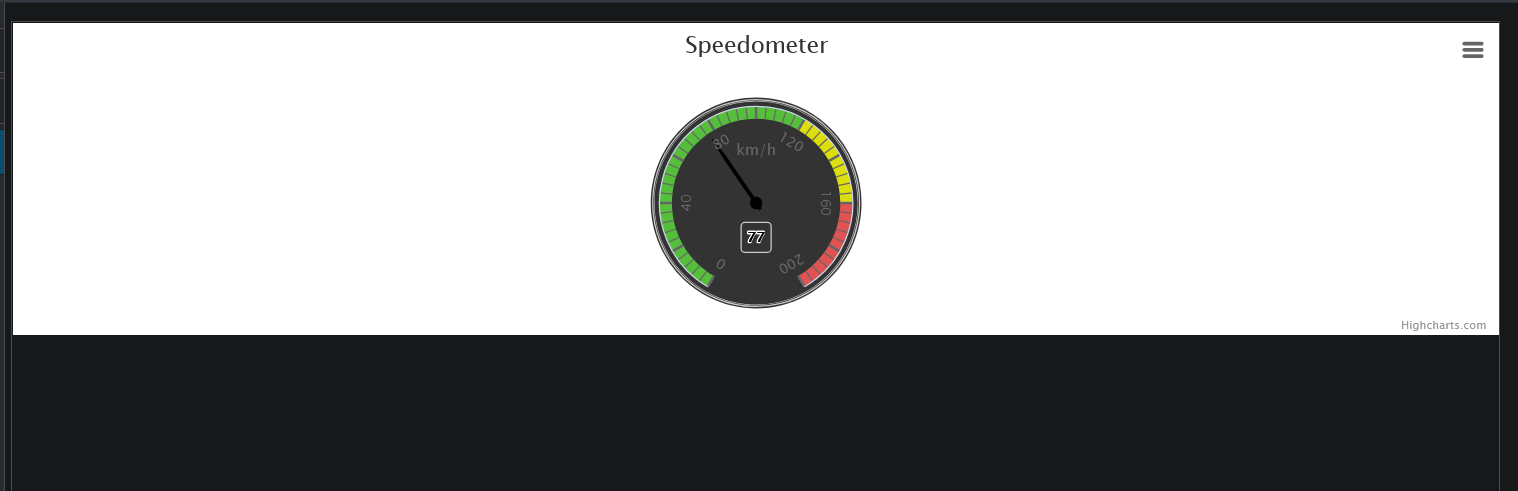
Render Highcharts Gauge Snippet
This snippet inserts a Speedometer as an example of loading and using a third-party library.
Switch to Page Snippet
This snippet uses the Switch to Page API to create a navigation widget (see the example above).
Call Server Action Snippet
This snippet calls a server action via JavaScript (see the example below).
Call a JavaScript Server Action Directly from the HTML Template
edgeCore version: 4.3.7
Make sure the JS server action exists in the system and then take the following steps in the HTML template visualization:
- In Renderer, click Code Snippets in the bottom left corner.
A pop-up with available snippets is displayed. - Find Call Server Action and click Insert Snippet.
A pop-up for choosing a server action is displayed. - Select the JavaScript action from the dropdown.
- Click Use Selected Action.
Both the HTML and JavaScript editors are automatically populated. - Click Next.
You are taken to the Preview tab, where the Run Action button is displayed. Click the button to test the action. - Click Save and Close.
- Find the page containing this HTML template visualization (or add this visualization to a page if you have not done it). Click the displayed Run Action button to perform the JS action.
Referencing edgeCore Rules in HTML Template
edgeCore version: 4.3.8
To reference edgeCore’s color, font, and icon rules in the HTML template, do the following when you start creating the HTML visualization:
- In Rule Sets, click +.
A pop-up for picking a rule set to reference is displayed. - Click on a rule set to select it and then click Use Selected.
The selected rule is displayed in Rule Sets. - In Alias, provide an alias (or leave the one that was automatically added when you selected the rule). You will need the alias in the renderer.
- From the Attribute dropdown, select the attribute the rule will be applied to.
- Click Next.
You are taken to the Renderer tab. - In Renderer, you should use and modify the following code (see example below):
<span *ngFor="let row of rows"> <div [ngStyle]="{'background-color': getColor('Alias', row)}" class="color-swatch"> <img [src]="getIcon('Alias', row).url"> <label [ngStyle]="{'font-size': getFontStyle('Alias', row).fontSize}">{{row.label}}</label> </div> </span> - Click Next to go to Preview, where you can view the result.
Example:
Our HTML template visualization is created off of the CSV feed that contains the following data (our rule will be applied to Price):
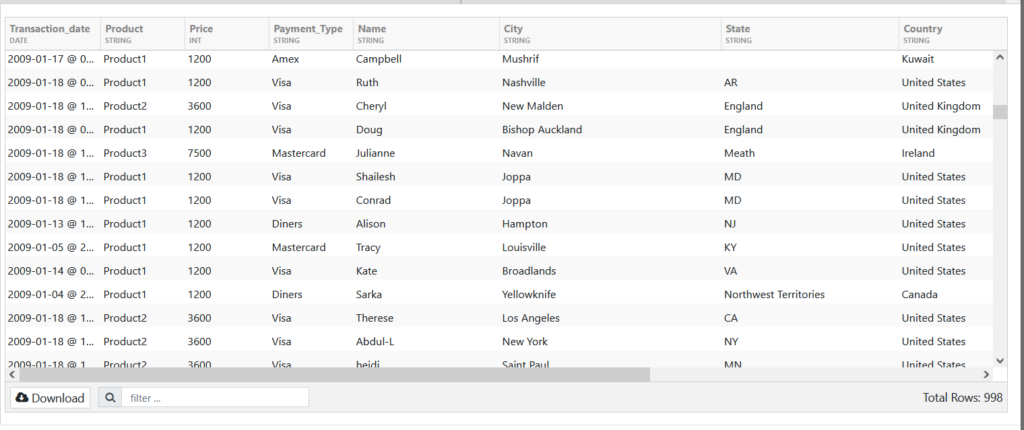
In Rule Sets, we have picked the following rules: SalesColor (its alias is SalesColor), SalesIcon (its alias is SalesIcon), and SalesFont (its alias is SalesFont). In Attribute, we have selected Price.
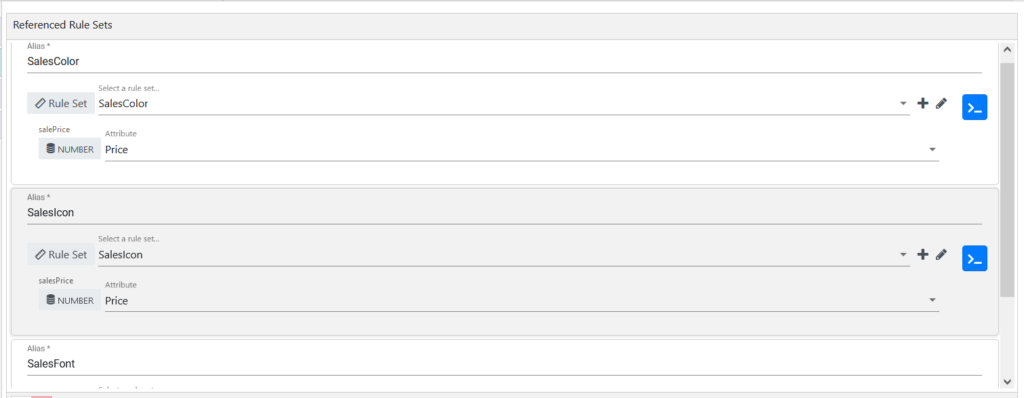
This is how our color rule is configured:

Icon rule:
![]()
Font rule:

In Renderer, we have entered the following code:
<div class="heatmap">
  <div *ngFor="let row of rows">
    <div [ngStyle]="{'background-color': getColor('SalesColor', row)}" class="sales-badge">
      <img [src]="getIcon('SalesIcon', row).url" [ngStyle]="{'width': getIcon('SalesIcon', row).size}" class="sales-icon">
      <span [ngClass]="getFontStyle('SalesFont', row).fontStyle"
            [ngStyle]="{'font-size': getFontStyle('SalesFont', row).fontSize, 'color': getFontStyle('SalesFont', row).color}">{{row.Price}}</span>
    </div>
  </div>
</div>
Where:
– getColor(‘Alias’, row)} is getColor(‘SalesColor’, row)}
– getIcon(‘Alias’, row) is getIcon(‘SalesIcon’, row)
– getFontStyle(‘Alias’, row) is getFontStyle(‘SalesFont’, row)
– {{row.label}} is {{row.Price}}, as we have previously selected Price as the attribute to which the rule will be applied;
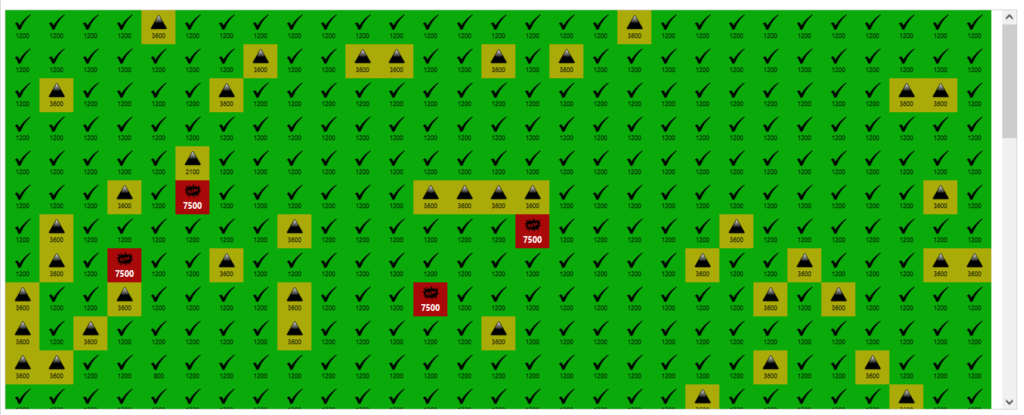
Based on everything we have configured, we get the following result in the Preview:
Require()
edgeCore version: 4.3.8
The Require() library is no longer supported.
Pre-load CSS or JS in edgeCore
A NodeJS Script enables you to build client extensions which can pre-load CSS or JS in edgeCore. This is useful if you want several HTML Templates to share a library.
Prerequisites
Installation Instructions
Globally install the NodeJS script with NPM
npm install —g @edge_technologies/edge—client—ext
Usage Instructions
- Make an empty directory somewhere.
mkdir —/temp
- Place the CSS and/or JS files you want to load on app startup into new folder.
cp myCoolScript.js —/temp/
- Change into new folder.
cd —/temp
- Run the NodeJS script.
edgeClientExt
The extension will now be inside the directory. Go to the Extensions page and upload it.
Accessing User Preferences
edgeCore version: 4.5.1
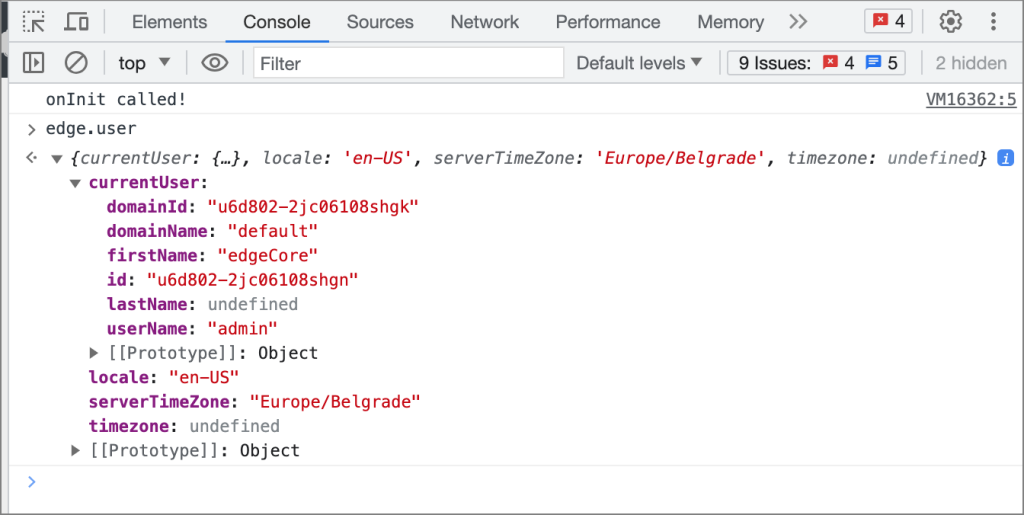
edge.user has been added to the window object so that HTML and JavaScript can access user information without APIs.
Type edge.user in the browser debug console to view its contents while the application is running.
Formatting Dates
Use the following APIs to format date attributes:
formatDate(value: any, options?: {format?: string, timezone?: string}): string
JavaScript example:
// subscribe to dataset changes
const mySubscription = component.rows$.subscribe(rows => {
  for (const row of rows) {
    // Example without using an options object
    row.DATE_ATTRIBUTE = component.formatDate(row.DATE_ATTRIBUTE);

    // Example with custom format and timezone options
    row.DATE_ATTRIBUTE = component.formatDate(row.DATE_ATTRIBUTE, {format:'MM/DD/YYYY', timezone: 'America/New_York'});
  }
});

// *** VERY IMPORTANT TO AVOID MEMORY LEAKS ***
component.onDestroy = () => {
    mySubscription.unsubscribe();
};
HTML example:
<div *ngFor="let row of rows">
<!-- You can use formatDate function without passing options object -->
    {{ formatDate(row.DATE_ATTRIBUTE) }}
<!-- Or if you would like to pass custom format and timezone options -->
    {{ formatDate(row.DATE_ATTRIBUTE, {format: 'MM/DD/YYYY', timezone: 'America/New_York'}) }}
</div>
    <!-- or to use Observable -->
<div *ngFor="let row of rows$ | async">
    {{ formatDate(row.DATE_ATTRIBUTE) }}
    {{ formatDate(row.DATE_ATTRIBUTE, {format: 'MM/DD/YYYY', timezone: 'America/New_York'}) }}
</div>
Custom Popup Options in Switch to Page Snippet
edgeCore version: 4.8.5
When inserting the Switch to Page snippet into the HTML Template, the snippet can show the page as a popup.
To show the page as a popup, do the following:
- Insert and set up the Switch to Page snippet.
- Go to the JavaScript tab.
Auto-generated code will be displayed.
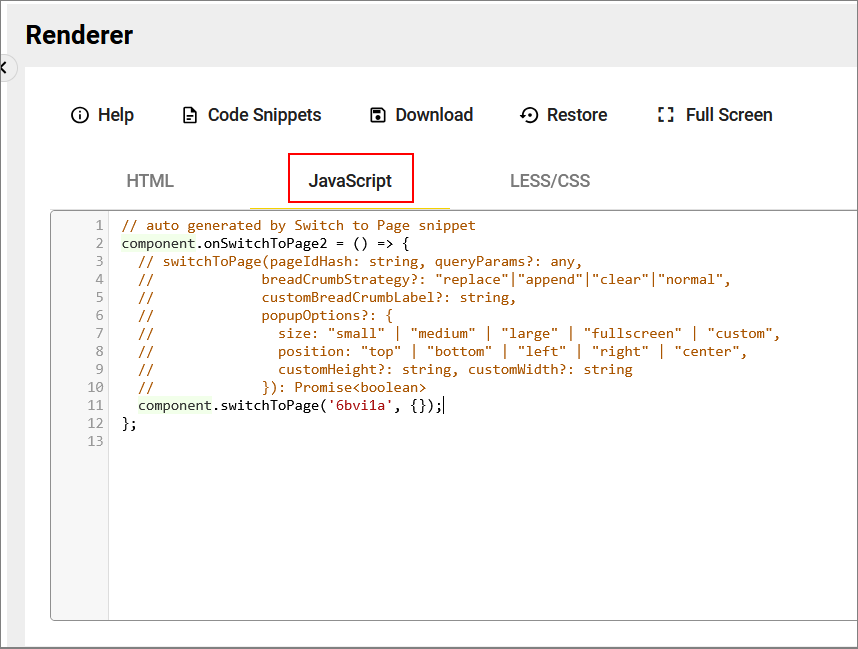
- In line 11, remove ); and add ,
- Hit Enter and add the following:
undefined,
undefined,
{ size: “custom”, position: “center”, height: ‘30%’, width: ‘30%’ });
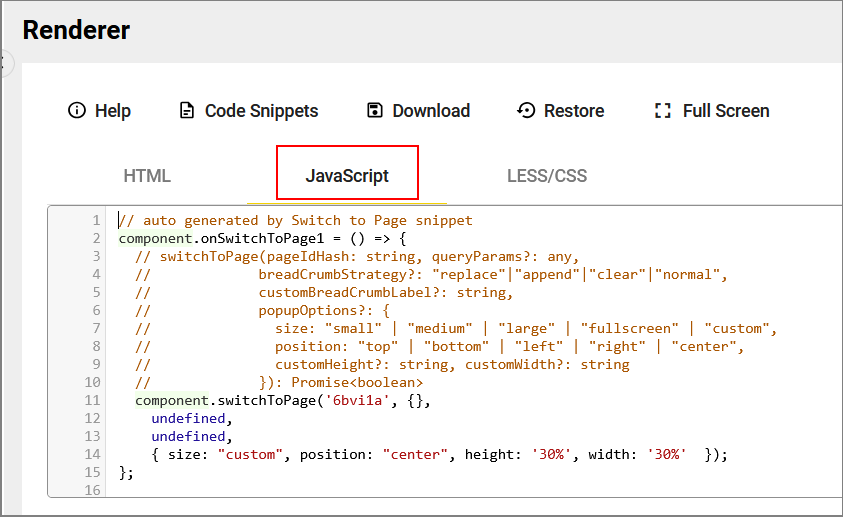
You can change size, position, height, and width as you see fit. - Click Next to go to Preview.
- Click on the snippet to view it as a pop-up.
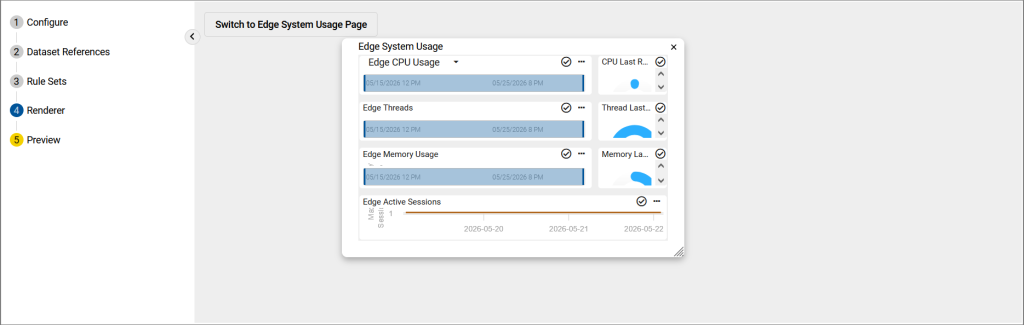
- Save your changes.
Related page: