Overview
For security reasons, it is recommended to run Edge over SSL (Secure Socket Layer). This will ensure that all communications between clients (browsers) and the Edge server are encrypted.
By default, Edge is configured with SSL disabled, but it does ship with a self-signed server certificate and can easily be enabled. In production environments, this certificate should be replaced with one issued by a known Certificate Authority (CA) or one signed by a trusted root certificate within the organization.
Configure Edge for SSL
The overall process involves:
- Obtain a signed certificate:
a. Pick a Certificate Authority. This may be in-house if the organization has a Standard Operating Environment with its own root certificate installed on all systems. Otherwise, this would be a commercial CA such as VeriSign, Thawte, or GoDaddy.
b. Create a private key and Certificate Signing Request (CSR).
c. Have the CA sign the request.
d. Download the signed certificate from the CA. Depending on the CA, a variety of formats may be on offer. Choose an appropriate format for Tomcat – which the CA may explicitly list as an option, otherwise choose PKCS#7 format. Other formats may require additional conversion steps before Tomcat can make use of it. - Alternatively, create a self-signed certificate (see below). However, end-users will be presented with certificate errors and warnings as the certificate is not signed by a trusted authority.
- Create a Java KeyStore (JKS) from the private key, signed certificate, and any intermediate certificates from the CA.
- Install the keystore file on the Edge server.
Create Self-Signed Certificate and Convert to JKS KeyStore
You will need to perform three steps.
Install OpenSSL
Windows OpenSSL
- Download OpenSSL.
- Run the EXE or MSI with default settings.
- Add OpenSSL to Path in Edit the system environment variables > Advanced > Environment Variables > User Variables.
This is optional, but it makes it easier to use OpenSSL from the command line in any directory. You should edit the existing Path in User variables to add OpenSSL. To do so, click Browse and search for OpenSSL and its bin folder. Once you add it, click OK on the screen and also on subsequent screens.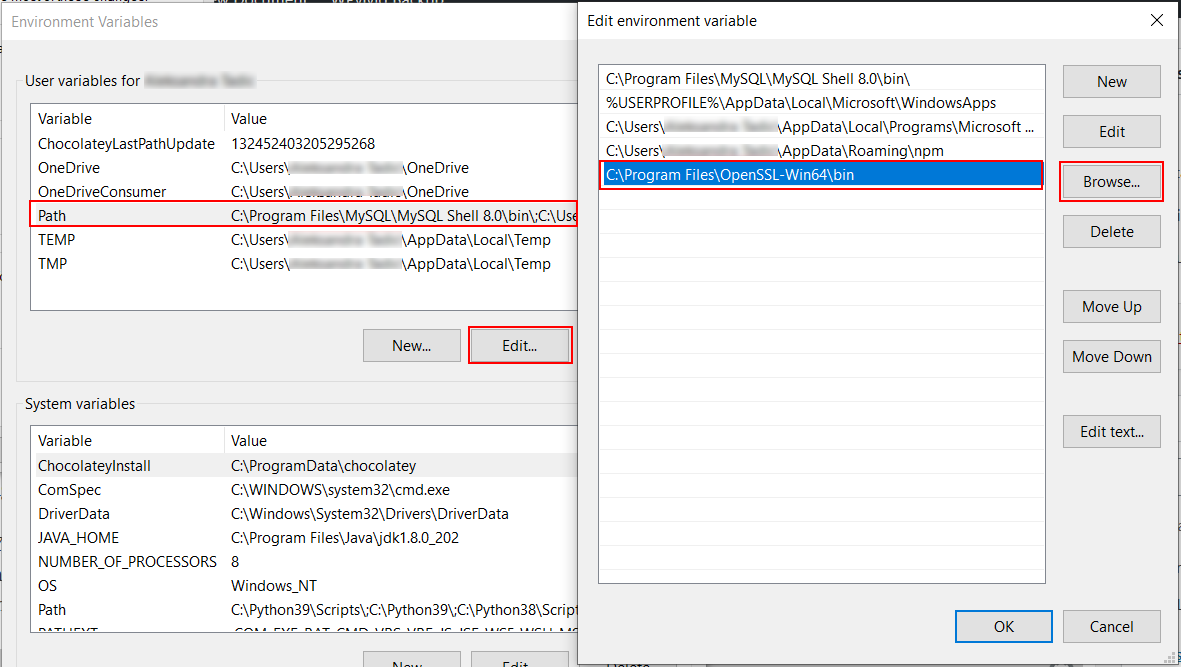
- Open Command Prompt in an arbitrary location to verify that OpenSSL can be accessed from outside its directory and run the following command:
You should see the following:openssl version
C:\Users\janedoe>openssl version
OpenSSL 3.0.0 7 sep 2021 (Library: OpenSSL 3.0.0 7 sep 2021)

C:\Users\janedoe>
MacOS OpenSSL
- Open Terminal and run:
brew install openssl
-
Check whether the system sees the library directly:
openssl version -a
This will return the SSL library which exists first in the PATH environment variable — either LibreSSL or OpenSSL. - Run the following:
You should see the following:brew info openssl
As seen above, OpenSSL is keg-only, so it has to be referred from an environment variable. This is done by running the echo ‘export… command. This may be a bit different on your system because it depends on its version. Copy/paste and run the echo line so that the necessary command is written to the .profile file.openssl@3 is keg-only, which means it was not symlinked into /usr/local, because macOS provides LibreSSL. If you need to have openssl@3 first in your PATH, run: echo 'export PATH="/usr/local/opt/openssl@3/bin:$PATH"' >> ~/.profile For compilers to find openssl@3 you may need to set: export LDFLAGS="-L/usr/local/opt/openssl@3/lib" export CPPFLAGS="-I/usr/local/opt/openssl@3/include"
- Check whether the system sees it now:
This will return:openssl version -a
edgetechnologies@Edges-MBP ~ % openssl version -a
OpenSSL 3.0.0 7 sep 2021 (Library: OpenSSL 3.0.0 7 sep 2021)
built on: Tue Sep  7 11:46:32 2021 UTC
platform: darwin64-x86_64-cc
options:  bn(64,64)
compiler: clang -fPIC -arch x86_64 -O3 -Wall -DL_ENDIAN -DOPENSSL_PIC -D_REENTRANT -DOPENSSL_BUILDING_OPENSSL -DNDEBUG
OPENSSLDIR: "/usr/local/etc/openssl@3"
ENGINESDIR: "/usr/local/Cellar/openssl@3/3.0.0_1/lib/engines-3"
MODULESDIR: "/usr/local/Cellar/openssl@3/3.0.0_1/lib/ossl-modules"
Seeding source: os-specific
CPUINFO: OPENSSL_ia32cap=0x7ffaf3ffffebffff:0x27ab
edgetechnologies@Edges-MBP ~ %
Ubuntu OpenSSL
- Download OpenSSL.
cd /usr/local/src/
sudo wget https://www.openssl.org/source/openssl-3.0.0.tar.gz
- Extract the downloaded file.
sudo tar -xf openssl-3.0.0.tar.gz
- Navigate to the extracted directory.
cd openssl-3.0.0
- Install OpenSSL.
sudo ./config --prefix=/usr/local/ssl --openssldir=/usr/local/ssl shared zlib
sudo make
sudo make test
sudo make install
- Configure OpenSSL Shared Libraries.
a) Navigate to the/etc/ld.so.conf.ddirectory and create a new configuration file openssl-3.0.0.conf.
b) Entercd /etc/ld.so.conf.d/ sudo nano openssl-3.0.0.conf
/usr/local/ssl/liband save.
c) Reload the dynamic link.
sudo ldconfig -v
- Configure OpenSSL Binary.
Here we are going to insert the binary of our newly installed version of OpenSSL (located at/usr/local/ssl/bin/openssl) to replace the default OpenSSL binary (located at/usr/bin/opensslor/bin/openssl).
a) Back up binary files.
b) Use vim to edit thesudo mv /usr/bin/c_rehash /usr/bin/c_rehash.backup sudo mv /usr/bin/openssl /usr/bin/openssl.backup
/etc/environmentfile.
Insert and save:sudo nano /etc/environment
c) Reload the OpenSSL environment and check the PATH bin directory.PATH="/usr/local/sbin:/usr/local/bin:/usr/sbin:/usr/bin:/sbin:/bin:/usr/games:/usr/local/games:/usr/local/ssl/bin"
d) Check the OpenSSL version.source /etc/environment echo $PATH
which openssl
openssl version -a
Create Self-Signed Certificate
- Generating Your Private Key
After deciding on a key algorithm, key size, and whether to use a passphrase, you are ready to generate your private key by running the following command:
openssl genrsa -out yourdomain.key 2048
This command generates a private key in your current directory named yourdomain.key (-out yourdomain.key) using the RSA algorithm (genrsa) with a key length of 2048 bits (2048). The generated key is created using the OpenSSL format called PEM.
Use the following command to decode the private key and view its contents:
openssl rsa -text -in yourdomain.key -noout
The -noout switch omits the output of the encoded version of the private key.
- Extracting Your Public Key
The private key file contains both the private key and the public key. You can extract your public key from your private key file if needed by running the following command:
openssl rsa -in yourdomain.key -pubout -out yourdomain_public.key
- Creating Your CSR
After generating your private key, you are ready to create your CSR. The CSR is created using the PEM format and contains the public key portion of the private key as well as information about you (or your company).
Use the following command:
The following is contained in a CSR:openssl req -new -key yourdomain.key -out yourdomain.csr
– Country Name (2 letter code): The two-letter country code where your company is legally located.
– State or Province Name (full name): The state/province where your company is legally located.
– Locality Name (for example, city): The city where your company is legally located.
– Organization Name (for example, company): Your company’s legally registered name (e.g. YourCompany, Inc.).
– Organizational Unit Name (for example, section): The name of your department within the organization. (You can leave this option blank, just press Enter.)
– Common Name (for example, server FQDN): The fully-qualified domain name (FQDN) (for example, www.example.com).
– Email Address: Your email address. (You can leave this option blank, just press Enter.)
– A challenge password: Leave this option blank (just press Enter).
– An optional company name: Leave this option blank (just press Enter).
After creating your CSR using your private key, we recommend verifying that the information contained in the CSR is correct and that the file has not been modified or corrupted. To do so, run the following command:
openssl req -text -in yourdomain.csr -noout -verify
- Creating a Self-Signed Certificate
Run the following command:
openssl x509 -signkey yourdomain.key -in yourdomain.csr -req -days 365 -out yourdomain.crt
Convert PEM to PKCS12 and Create JKS
PKCS#12 (also known as PKCS12 or PFX) is a binary format for storing a certificate chain and private key in a single, encryptable file.
- Run the following command:
openssl pkcs12 -inkey yourdomain.key -in yourdomain.crt -export -out combined.p12 -name your-alias
Remember your alias, because you will need it to create JKS. - Enter Export Password: Enter the private key password that you have previously set.
- Verifying – Enter Export Password: Enter the private key password that you have previously set.
- Create a JKS from the combined.p12 file generated above by running the following command:
keytool -importkeystore -srckeystore combined.p12 -srcstoretype PCKS12 -alias your-alias -destkeystore your-keystore.jks
New Certificates
The recommended approach is to use keytool to create the private key, CSR, and keystore. The CA with then sign and provide a signed certificate along with their own certificate chain which can be imported into the keystore. Most CAs have this process well documented for popular web server platforms. Just follow the instructions for Tomcat such as these from VeriSign – and remember to refer back to this documentation on installing the keystore:
- Create a CSR and submit it for signing (using keytool and creating a keystore in the process).
- Import the signed certificate into a JKS keystore (in PKCS#7 / .p7b format)
- Follow the instructions below on how to Enable SSL & Install the Keystore
Existing Keys & Certificates
A limitation of keytool is that existing private keys cannot be imported. So for situations with an existing private key, regardless of the certificate format, it will be necessary to use OpenSSL to do the conversion.
For existing private key with a signed certificate and intermediate certificates in X.509 format follow these steps:
- Convert the private key (private.key), signed certificate (server_signed.crt), and intermediate certificates (ca.crt) into PKCS#12 format:
openssl pkcs12 -export -in server_signed.crt -inkey private.key -CAfile ca.crt -caname root -chain -out combined.p12 -name your-alias
You will be prompted to set a password. This must be set – do not leave blank. If you do not have any intermediate certificates then leave out the -CAfile, -caname, and -chain options. - Create a JKS from the combined.p12 file generated above:
keytool -importkeystore -srckeystore combined.p12 -srcstoretype PKCS12 -alias your-alias -destkeystore your-keystore.jks
You will be prompted for the password set above and a new password, you must use the same password.your-aliasmust match the alias set in step (1). - Take the resulting JKS file (your-keystore.jks) and follow the instructions below to Enable SSL & Installing the Keystore.
For existing private key with signed certificate and intermediate certificates in PKCS#7 (.p7b) format follow these steps:
- Convert the PKCS7 file (certs.p7b) to PEM encoded certificates:
openssl pkcs7 -in certs.p7b -inform DER -print_certs -out certs.crt - Convert the private key (private.key) and certificates (certs.crt from above):
openssl pkcs12 -export -in certs.crt -inkey private.key -out combined.p12 -name your-alias
You will be prompted to set a password, this must be set – do not leave blank! - Create a JKS from the combined.p12 file generated above:
keytool -importkeystore -srckeystore combined.p12 -srcstoretype PCKS12 -alias your-alias -destkeystore your-keystore.jks - Take the resulting JKS file (your-keystore.jks) and follow the instructions below to Enable SSL & Installing the Keystore.
Enable SSL & Install the Keystore
Once a valid keystore has been created it can be installed on the Edge server:
- Copy the keystore to the
[INSTALL_HOME]/conf/ssl/directory. By default files in this directory are automatically included in full archives. - Edit
environment.sh|.batand:
a. updateKEYSTORE_FILEandKEYSTORE_PASSas required. Please note the keystore file path is relative to[INSTALL_HOME]/
b. Optional: rather than changeKEYSTORE_PASS; you can editcustom.propertiesand settruststore.pass=<pass>. After edgeCore starts; this property will be encrypted.
c. updateKEYSTORE_TYPEif using something other than Java KeyStore (JKS) format.
d. setHTTP_SSLto true.
e. (optional) setHTTP_PORTto the desired port. - Restart the Edge server.
Replace Certificates
Once a certificate expires, you will need to generate a new certificate and replace the old one in the keystore. The following steps assume that you are updating the keystore located in [INSTALL_HOME]/conf/ssl/:
- In the terminal, navigate to your
[JAVA_HOME]/bin/the directory containing the keytool. - If you are unsure which certificate you need to replace, you can view the contents of the keystore with:
keytool -list -v -keystore [INSTALL_HOME]/conf/ssl/keystore.jks - Delete the old certificate:
keytool -delete -alias <old cert alias> -keystore [INSTALL_HOME]/conf/ssl/keystore.jks - Import the new certificate:
keytool -import -v -noprompt -trustcacerts -alias <new cert alias> -file <path to new cert>/newcert.cer -keystore [INSTALL_HOME]/conf/ssl/keystore.jks - After importing the new certificate, you will need to restart the server in order for it to take effect.
Configure Client Certificate Authentication
For client certificate validation the Truststore will need to be configured. The following steps assume that you have a truststore file with a proper chaining certificates imported.
Edit tomcat/conf/server.xml; and ensure the following lines are configured (they must be moved inside of the <Connector>… block just after the line ‘clientAuth=“${clientauth}””
clientAuth="${clientauth}"
truststoreFile="${truststore.file}"
truststorePass="${truststore.pass}"
truststoreType="${truststore.type}"- Configure the clientAuth=true in
[INSTALL_HOME]/conf/environment.(sh|bat) files. - Configure the truststore.file=<truststoreFile> in
[INSTALL_HOME]/conf/custom.properties; or optionally it can be configured in[INSTALL_HOME]/conf/environment.(sh|bat) files. - Configure the truststore.pass=<truststorePass> in
[INSTALL_HOME]/conf/custom.properties; or optionally it can be configured in[INSTALL_HOME]/conf/environment.(sh|bat) files. - Configure the truststore.type=<truststoreType> in
[INSTALL_HOME]/conf/custom.properties; or optionally it can be configured in[INSTALL_HOME]/conf/environment.(sh|bat) files.
Using custom.properties to configure the truststore.pass has the advantage of encrypting the password that is configured; while the configuration made in either environment.(sh|bat) files will not be encrypted and assumes the environment is secure. The truststore.pass will only be read and encrypted if client certificate authentication is enabled and the server.xml includes the block above.
Redirect HTTP traffic
There are two recommended approaches for redirecting standard HTTP traffic to HTTPS:
- Use an external tool to redirect the traffic such as a load balancer or a full-featured HTTP server like Apache. For many, this will be the preferred option since no configuration changes to Edge are necessary.
- Modify
tomcat/conf/server.xmlandtomcat/conf/web.xmlto define an extra non-SSL connector that will redirect to the HTTPS port.
Related page:
– SSL Exception – Troubleshooting