If you want to display a calendar on a page, you may do so in a few different ways.
Creating an HTML date picker
Take the following steps:
- In the pipeline, find any feed (for example, a CSV) and click the gear icon > + > New Visualization.
A pop-up is displayed. - Select HTML Template.
A new window is displayed. - Provide a name for the visualization (for example, Calendar).
- Go to the Renderer tab > HTML and paste the following code:
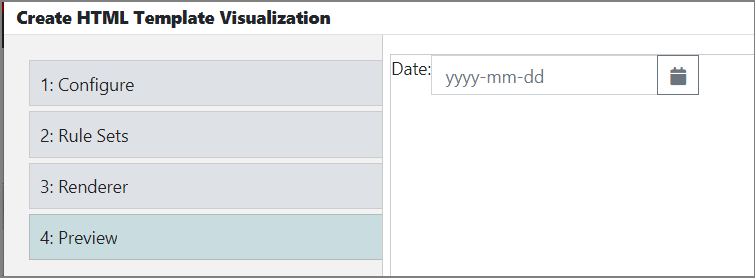
<form class="form-inline"> <div class="form-group"> <div class="input-group"> <p>Date: </p> <input class="form-control" placeholder="yyyy-mm-dd" name="dp" [(ngModel)]=model ngbDatepicker #d="ngbDatepicker"> <div class="input-group-append"> <button class="btn btn-outline-secondary calendar" (click)="d.toggle()" type="button"><i class="fa fa-calendar"></i></button> </div> </div> </div> </form>
- Go to Preview to view the end result.
To open an interactive calendar in a small overlay click the calendar icon.
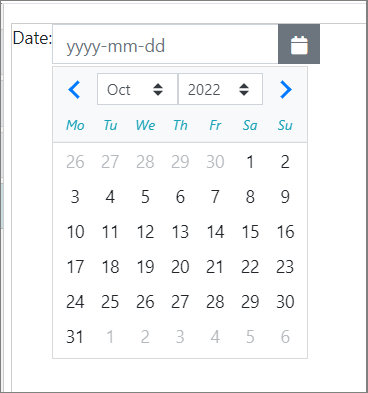
To close the calendar, choose a date, click elsewhere on the page, or hit the Esc key.
Creating an HTML datetime picker
edgeCore version: 4.5.0
- Repeat steps 1-3 outlined above.
- In Renderer > HTML paste the following code:
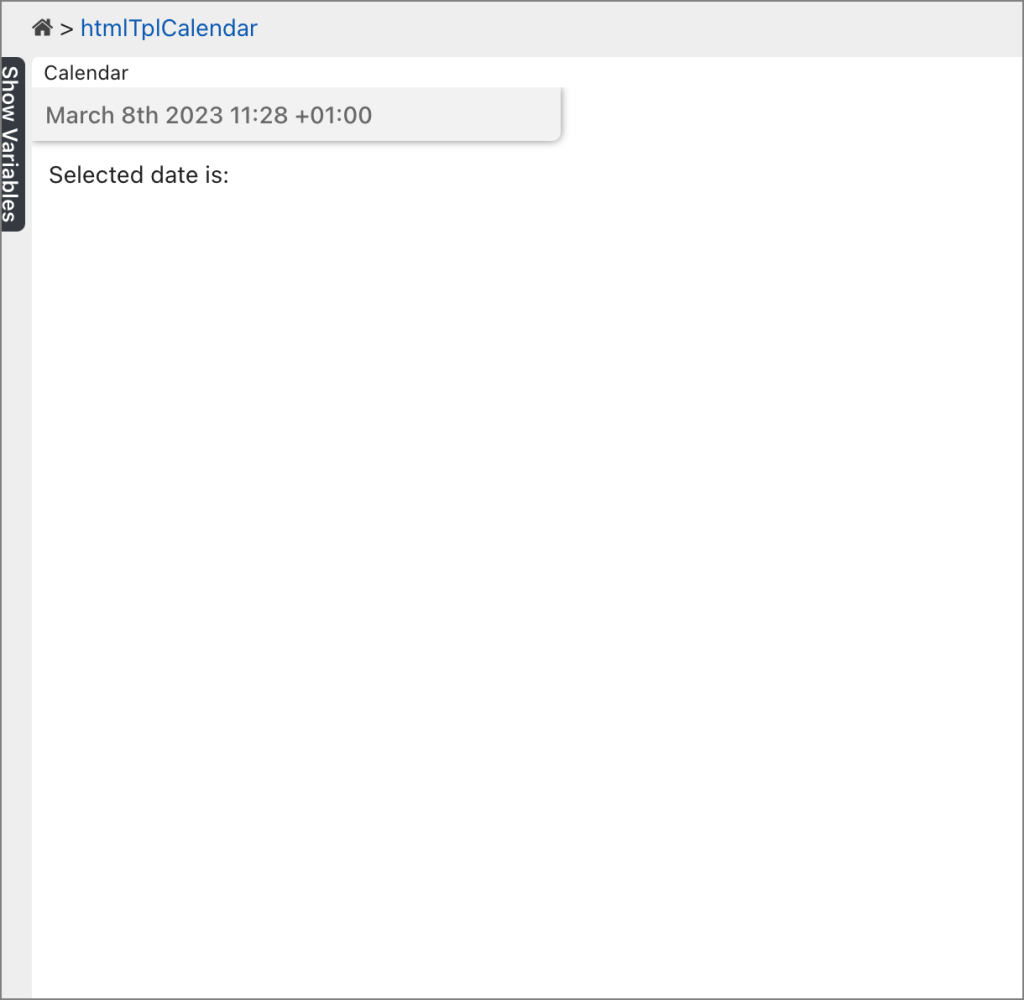
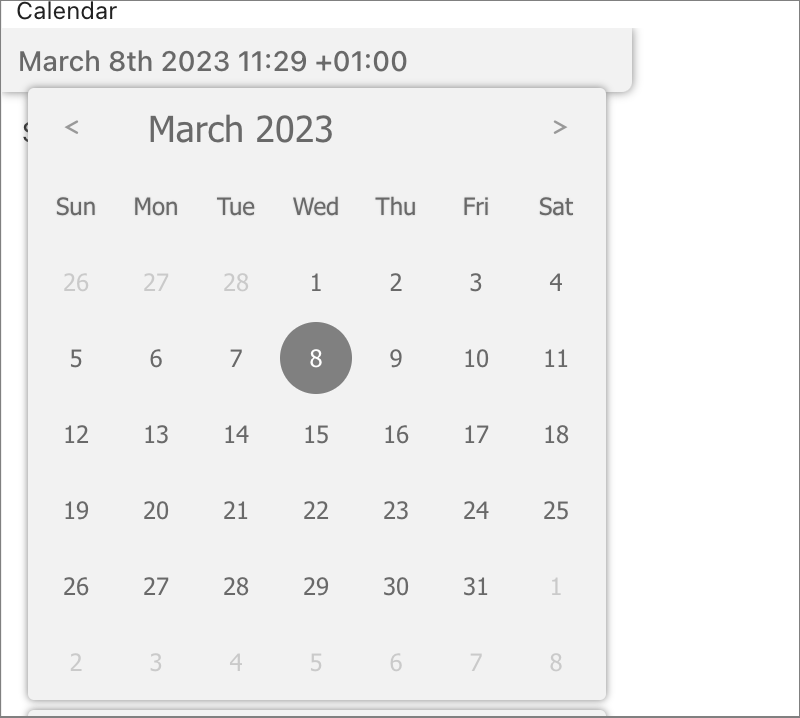
<!-- jsCalendar v1.4.4 Javascript and CSS from unpkg cdn --> <div class='container'> <div class='calendar-header'> <div class='calendar-clock'> <h6 id='clock'></h6> <!-- target jsCalendar element --> <div id="calendar"></div> </div> </div> <div class='calendar-events'> <!-- <div class='event' *ngFor="let row of rows"><strong><span>{{row.SUMMARY}}</span></strong> - <span>{{row.CATEGORIES}}</span> <strong><span>@ {{row.LOCATION}}</span></strong> - <span>{{row.CLASS}}</span><br><span>Created: {{row.CREATED | date:long}}</span><hr><span>Starts at: {{row.DTSTAMP | date:'long' }}</span><br><span>Repeats: <strong>{{row.RRULE||'FREQ=No' | slice : 5 | titlecase }}</strong></span><br><div class='event-desc'><span>{{row.DESCRIPTION}}</span></div></div>--> <div id="date-container"> Selected date is: </div> </div> </div>
- In Renderer > JavaScript paste the following code:
function refreshData() { var time = moment().format('MMMM Do YYYY HH:mm Z'); $('#clock').text(time); setTimeout(refreshData, 1000); } refreshData(); // execute function function init() { component.loadResources(['https://unpkg.com/simple-jscalendar@1.4.4/source/jsCalendar.min.js', 'https://unpkg.com/simple-jscalendar@1.4.4/source/jsCalendar.min.css']).then(() => { //console.log('resources have been loaded and can now be used'); // Please note, the then() function will be called every time the visualization // is initialized, despite if the script has previously been loaded. jsCalendar.new("#calendar", "now", { monthFormat: "month YYYY", dayFormat: "DDD" }).onDateClick(function(event, date) { // console.log('Date: ', date); $('#date-container').text("Selected date is: " + date.toString()); }); }); } // ... any additional javascript or functions ... init();
- In Renderer > CSS paste the following code:
.container { display: block; height: 100%; width: 100%; margin: 0px; padding: 0px; overflow: auto; max-width: unset; } .calendar-header { display: block; width: 315px; transition:all 0.4s; height: 32px; border-radius: 0px 0px 5px 0px; background: #f2f2f2; box-shadow: 0px 0px 5px gray; padding: 8px; position: absolute; top: 0; left: 0; color: dimgray; z-index: 100; h3 { margin: 0px; margin-bottom: 0; font-weight: 500; line-height: 1.6; } .calendar-clock { display: block; width: 100%; } #clock { margin-bottom: 0px; } .jsCalendar table { display:none; opacity:0; height:0px; background-color: #f2f2f2; border-collapse: collapse; border-radius: 3px; box-shadow: none; color: #696969; font-family: Tahoma, Geneva, sans-serif; margin: 5px; transition:all 0.4s; box-shadow:0px 0px 4px gray; } } .calendar-header:hover { .jsCalendar table { display:block; opacity:1; height:auto; } } .evt-count { color: gray; font-size: small; } .calendar-events { padding: 10px; overflow: auto; width: 100%; height: 100%; padding-top: 42px; .event { display: block; width: 96%; margin: 2% 2%; background: #f2f2f2; box-shadow: 0px 0px 2px lightgray; border-radius: 5px; border: solid 1px #cccccc; transition: all 0.2s; padding: 10px; } .event-desc { padding: 10px; width: 100%; height: auto; background: white; margin-top: 10px; border-radius: 4px; box-shadow: 0px 0px 2px gray inset; } hr { margin: 2px; } .event:hover { cursor: pointer; transform: scale(1.05); box-shadow: 0px 0px 20px dimgray; } } .calendar-events::-webkit-scrollbar { display: none; } .calendar-events { -ms-overflow-style: none; /* IE and Edge */ scrollbar-width: none; /* Firefox */ } .jsCalendar tbody td.jsCalendar-current { background-color: #808080; border-radius: 18px; color: #fff; }
- Click Save and Close and add the HTML visualization to a page.
Creating an HTML Google-like Calendar
edgeCore version: 4.5.0
- Download the Calendar extension and the calendar csv file.
- Go to system menu > Extensions.
- Upload the calendar extension you downloaded in step 1.
- Click Activate.
- When the extension is activated, go to your pipeline and create a CSV feed from any connection.
- Upload the calendar csv file you downloaded in step 1 and provide a name for the feed.
- Go to the Preview tab and click Save.
- Create an HTML Template off of that feed.
- Provide a name and go to the Renderer tab.
- In HTML, paste the following code:
<div id="calendar-container"> <form #f="ngForm"> <!-- <input type="date" name="calendarDateInput" onchange="setDate($event)" /> --> <!-- ngbDatePicker --> <div class="calendar-header__inputs"> <div class="calendar-date__input"> <label for="calendarDateInput">Date:</label> <input id="dateInput" type="date" name="calendarDateInput" (change)="setDate($event)" /> </div> <mat-form-field appearance="none" id="agency-form__input" > <mat-label>-- Select Agency --</mat-label> <mat-select class="select_form_inputs" name="agencySelectField" [(ngModel)]="selectedAgency" (selectionChange)="onSelection($event)"> <mat-option *ngFor="let agency of agencies" [value]="agency.value">{{agency.label}}</mat-option> </mat-select> </mat-form-field> <mat-form-field appearance="none" id="location-form__input" > <mat-label>-- Select Location --</mat-label> <mat-select class="select_form_inputs" name="locationSelectField" [(ngModel)]="selectedLocation" (selectionChange)="onSelection($event)"> <mat-option *ngFor="let loc of locations" [value]="loc.value">{{loc.label}}</mat-option> </mat-select> </mat-form-field> <button type="reset" id="reset-btn" (click) ="agency= ''; location='';">Reset</button> </div><!-- .form-group --> </form> <div id="calendar-controls"> <div class="controls-group"> <button (click)="setView('month')">month</button> <button (click)="setView('week')">week</button> <button (click)="setView('day')">day</button> </div> <div class="font-large">{{ currentDate }}</div> <div class="controls-group"> <button (click)="setToday()">today</button> <button (click)="goPrev()"><</button> <button (click)="goNext()">></button> </div> </div> <div id="softility-calendar" style="height: 800px;"></div> </div>
- In JavaScript, paste the following code:
console.log(component.widgetID); const formFieldEl = document.querySelector(`#${component.widgetID} mat-form-field#agency-form__input.mat-form-field.mat-form-field-appearance-outline`); console.log(formFieldEl); /* const Months = { 0: "January", 1: "February", 2: "March", 3: "April", 4: "May", 5: "June", 6: "July", 7: "August", 8: "September", 9: "October", 10: "November", 11: "December", }; */ component.currentDate = ""; component.selectedValue = { agency: "", location: "" }; component.selectedAgency = ""; component.selectedLocation = ""; let calendar; let calendarEvents = []; component.agencies = [ {label:'PSAC', value: 'PSAC'}, {label:'PSAC-DCAS', value: 'PSAC-DCAS'}, {label:'PSAC-NYPD', value: 'PSAC-NYPD'}, {label:'PSAC-FDNY', value: 'PSAC-FDNY'} ]; component.locations = [ {label:'PSAC1', value: 'PSAC1'}, {label:'PSAC2', value: 'PSAC2'}, {label:'SDE', value: 'SDE'}, ]; component.onSelection = (ngEvent) => { //console.log("Angular event: ", ngEvent.source.ngControl); const {value} = ngEvent.source.ngControl.control; if (ngEvent.source.ngControl.name === "agencySelectField") { component.selectedValue.agency = value; } if (ngEvent.source.ngControl.name === "locationSelectField") { component.selectedValue.location = value; } console.log("Selected value (inside fn): ", component.selectedValue); component.setPageVars({ 'agency': component.selectedValue.agency, 'location': component.selectedValue.location }); }; function getNavbarRange(tzStart, tzEnd, viewType) { var start = tzStart.toDate(); var end = tzEnd.toDate(); var middle; if (viewType === 'month') { middle = new Date(start.getTime() + (end.getTime() - start.getTime()) / 2); return window.moment(middle).format('MMMM YYYY'); } if (viewType === 'day') { return window.moment(start).format('YYYY-MM-DD'); } if (viewType === 'week') { return window.moment(start).format('YYYY-MM-DD') + ' ~ ' + window.moment(end).format('YYYY-MM-DD'); } throw new Error('no view type'); } function displayRenderRange() { var rangeStart = calendar.getDateRangeStart(); var rangeEnd = calendar.getDateRangeEnd(); component.currentDate = getNavbarRange(rangeStart, rangeEnd, calendar.getViewName()); } function update() { displayRenderRange(); } function init() { component.loadResources(['softility-calendar/tui-calendar.min.js','softility-calendar/tui-calendar.min.css']) .then(() => { console.log('resources have been loaded and can now be used'); // Please note, the then() function will be called every time the visualization // is initialized, despite if the script has previously been loaded. const container = document.getElementById("softility-calendar"); calendar = new window.tui.Calendar(container, { usageStatistics: false, calendars: [{ id: 'softility-calendar', name: 'Softility' }], defaultView: 'month', week: { startDayOfWeek: 1 }, month: { startDayOfWeek: 1 } }); component.currentDate = window.moment(new Date(calendar.getDate())).format("MMMM YYYY"); component.setView = (viewDate) => { calendar.changeView(viewDate); }; component.setToday = () => { calendar.today(); update(); }; component.goNext = () => { calendar.next(); update(); }; component.goPrev = () => { calendar.prev(); update(); }; component.setDate = (_ev) => { //console.log("Event: ", _ev.target.valueAsDate); calendar.setDate(_ev.target.valueAsDate); update(); }; return calendar; }) .then((_cal) => { //console.log("Calendar: ", _cal); const mySubscription = component.rows$.subscribe(rows => { for (const row of rows) { const calEvent = { id: row.ChangeID, calendarId: _cal.container.id, title: row.Summary, start: window.moment(new Date(row.Start_Date)).format(), end: window.moment(new Date(row.End_Date)).format(), }; calendarEvents.push(calEvent); } _cal.createEvents(calendarEvents); }); component.onDestroy = () => { mySubscription.unsubscribe(); }; }); } init(); component.onDataChanged = (rows) => { console.log("Data changed!:\n", rows); calendarEvents = []; calendar.clear(); for (const row of rows) { const calEvent = { id: row.ChangeID, calendarId: calendar.container.id, title: row.Summary, start: window.moment(new Date(row.Start_Date)).format(), end: window.moment(new Date(row.End_Date)).format(), }; calendarEvents.push(calEvent); } calendar.createEvents(calendarEvents); };
- In CSS, paste the following code:
#calendar-container { height: 100%; overflow: auto; padding: 15px; } .font-large { font-size: 24px; } #calendar-controls { display: flex; justify-content: space-between; align-items: center; padding-top: 15px; padding-bottom: 15px; font-size: 16px; .controls-group { button { background-color: orange; border-radius: 3px; color: black; margin-right: 5px; padding: 5px; border: none; min-width: 50px; } } } .calendar-header__inputs { display: flex; align-items: center; } #dateInput{ border: 1px solid #DC9108; height: 3rem; border-radius: 5px; width:13rem; margin-left:0.5rem; padding-left:0.7rem; padding-right:0.7rem; } #calendar-inputs{ display:flex; justify-content:flex-start; align-items:center; } #agency-form__input{ border-radius: 5px; margin-right:0.5rem; margin-left:1rem; margin-top:15px; .mat-form-field-label { top: 2.25rem; } } #location-form__input{ border-radius: 5px; margin-right:1rem; margin-left:1rem; margin-top:15px; .mat-form-field-label { top: 2.25rem; } } .select_form_inputs{ border: 1px solid #FFA500; border-radius: 5px; height:3rem; padding: 13px; } #reset-btn{ background-color: orange; border-radius: 3px; color: black; padding: 5px; border: none; min-width: 80px; min-height:35px; }
- Go to the Preview tab and observe the calendar.
- Save the HTML visualization and add it to a page.