edgeCore version: 5.0.0
The AI Code Assistant is currently available in SQL and JavaScript transforms.
Enabling the AI Assistant
- Contact the Support to obtain the AI license and edgeCore version 5.0.0.
- Install edgeCore 5.0.0 (Windows or Linux/UNIX).
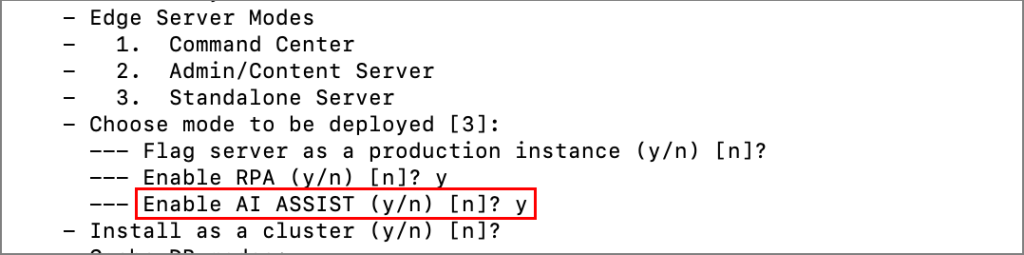
NOTE: Make sure to enable the AI assistant.
➤Linux/UNIX: when running the configure.sh script, enable AI ASSIST under Server Modes;
➤ Windows:
a) Go to the conf folder of your edgeCore build.
b) Open the environment.bat file.
c) In the bat file, find the following: rem set EDGE_SERVER_AI_ASSIST=true
d) Remove rem
e) Save the change and close the file. - Start edgeCore and log in.
- Upload the license containing the AI feature.
- Restore your backup archive (if you have already used edgeCore).
If you are new to edgeCore, start with exercises.
Tips for Writing Prompts
✅Use precise language.
✅Express the intended result or information clearly and directly (for example, join two datasets, or add the current date to the existing dataset).
✅Specify column names.
✅Specify the order of results (ASC/DESC) or limits on the number of rows.
Example 1: AI Assistant Used to Join Two Datasets
In this example, we are going to use the AI Assistant in the SQL transform to join two datasets.
The Customers dataset contains the basic customer information along with an id field which is used when they place an order. The Orders dataset contains info about the orders placed. Every order has tracked the customer who purchased it by a customerId.
Step 1: Create Two CSV Feeds
Take the following steps:
- Download orders.csv and customers.csv.
- Go to the Pipeline and click + Add Connection in the upper-left corner.
A pop-up for selecting a connection type is displayed. - In the pop-up, select File / Server Filesystem connection type.
- Click Use Selected.
A new page is displayed. - In Connection Name, enter a name for the connection (for example, CustomerOrders).
- Make sure the Enable Connection toggle is on.
- In Server Path, provide a relative path from the installation folder of edgeCore. For the purpose of this example, you can leave the field as is.
- Click Next.
You are taken to the Test Connection tab where the confirmation message Connection test was successful is displayed. - Click Save and Close.
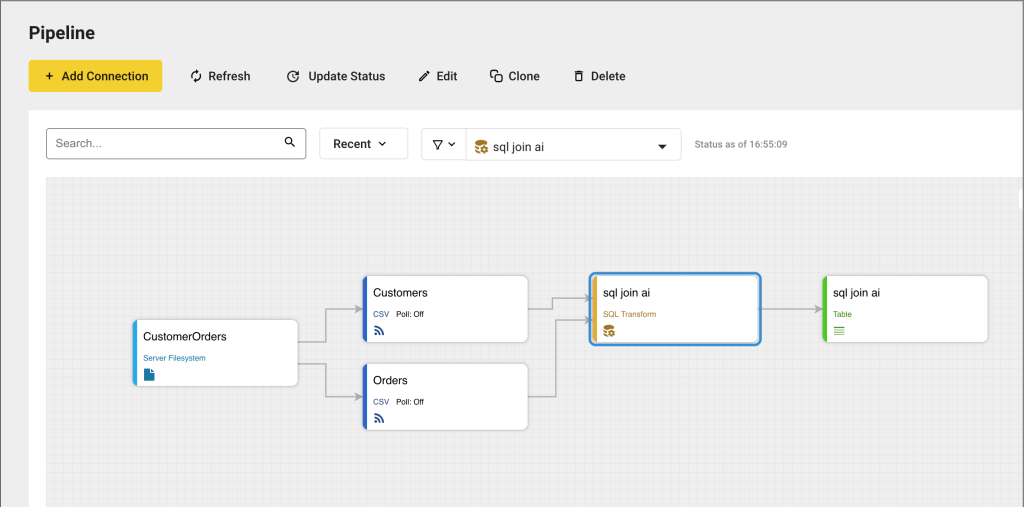
The newly created connection is displayed in the Pipeline. Since we have two CSV files, we are going to create two CSV feeds now that you have established a connection to the filesystem. - Hover over the CustomerOrders Server Filesystem connection for the gear icon to appear on the right, click the gear icon button in the connection box and select + .
A pop-up for choosing a Feed Type is displayed. - In the pop-up, select CSV.
A new page is displayed. - Create two CSV Feeds off of the previously created connection (one for Customers and one for Orders just like in the screenshot above).
a) For both of these, in File Name upload the respective CSV files (customers.csv and orders.csv) and select them from the dropdown.
b) In Feed Name, for the Customers CSV feed enter Customers, and for the Orders CSV enter Orders (by default, the name will be the same as the file name so you just need to remove CSV from the feed name).

c) Click Next to go to the CSV parser. No changes are needed here, so click Next again to go to Published Attributes.
Here you can see all attributes from the csv files. No changes are needed here, so you can proceed to Data Preview where you can observe the data preview of your CSV feeds. - Click Save and Close.
The newly created feeds are displayed in the Pipeline (just like in the screenshot at the beginning of the example).
Step 2: Create SQL Transform
Now that you have created two CSV feeds, you can create a SQL transform where you are going to use the AI Assistant to join these two datasets.
- Hover over one of the created CSV feeds for the gear icon to appear on the right, click the gear icon button in the connection box and select + New Transform.
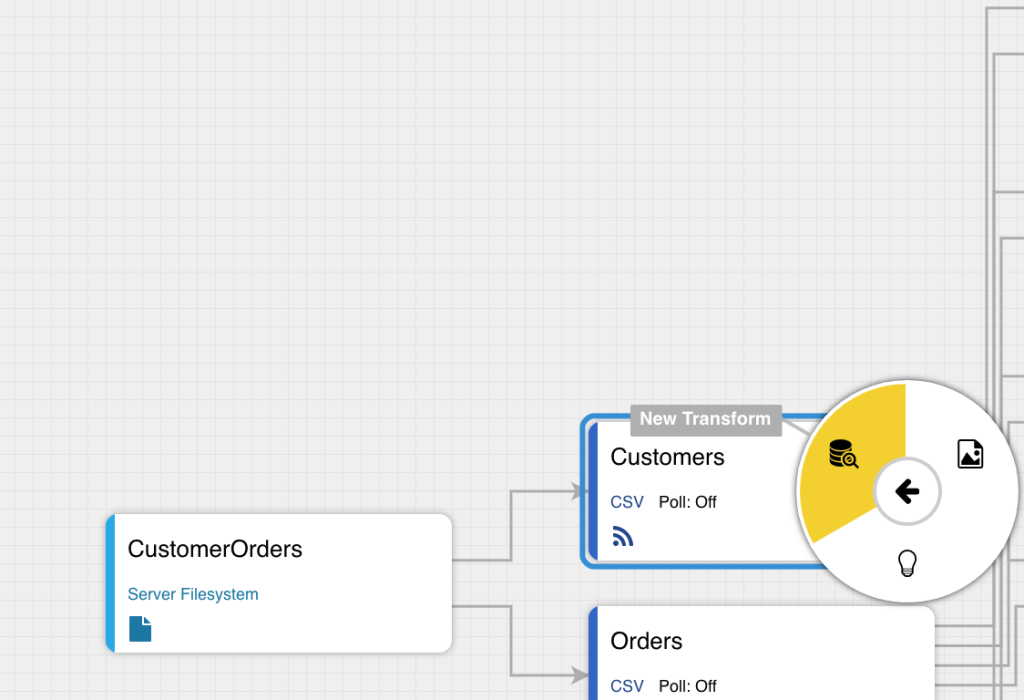
A pop-up for choosing a Transform Type is displayed. - In the pop-up, select SQL Transform.
A new page is displayed. - In Configure, provide a Transform Name (for example, JoinDatasets) and click Next to go to Dataset References.
- In Dataset References, only one dataset is displayed (the one from which you created the transform) so click Add Dataset and find the other dataset in the dropdown as both Customers and Orders need to be referenced.

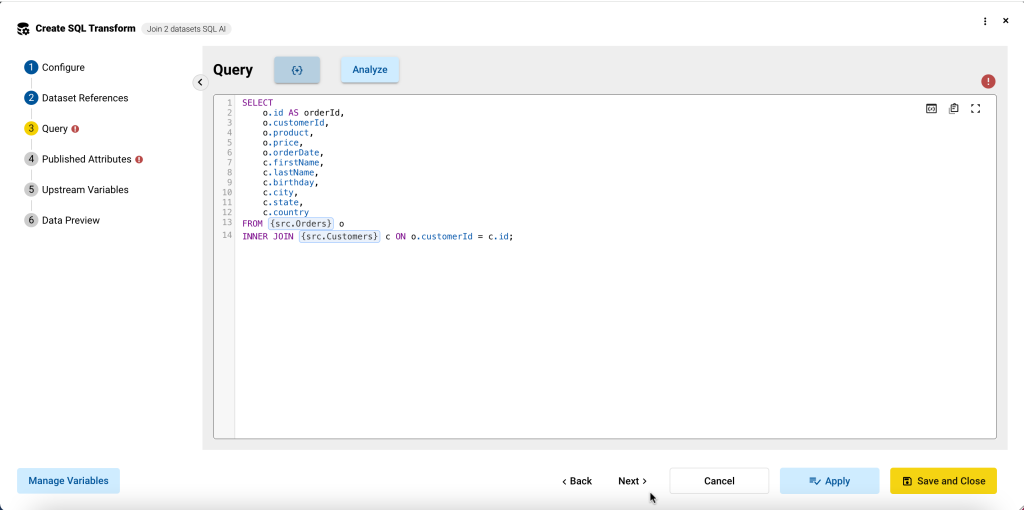
Click Next to go to Query. - In Query, delete the default query and click the Code Assist icon.
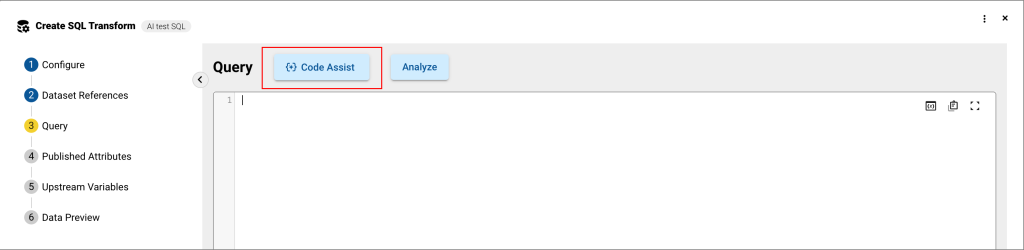
A new window where you can interact with the AI Assistant is displayed.
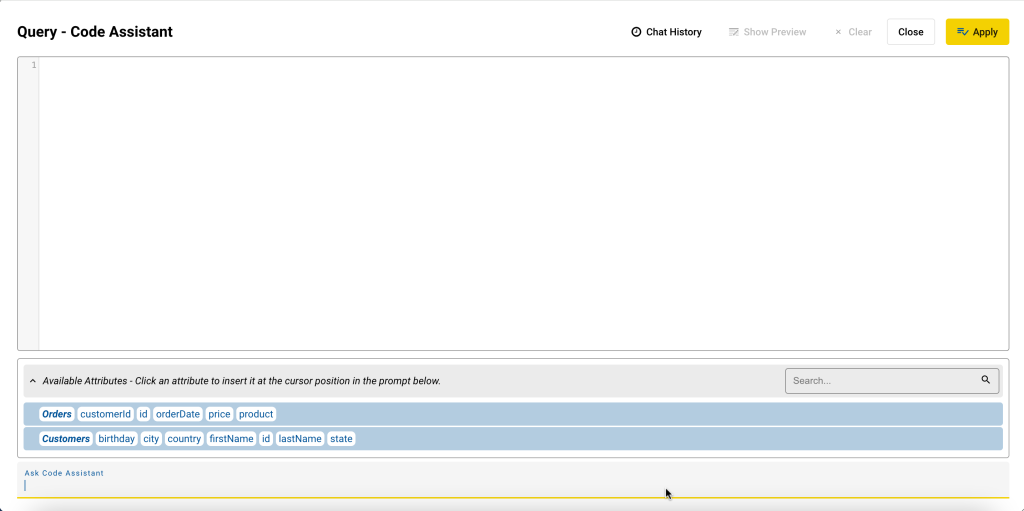
As seen in the screenshot, available attributes are displayed, and there is a field for your prompt (Ask Code Assistant). - In the prompt field, enter what you want the Assistant to perform.
Since we want to join two datasets, this is the prompt we are going to use:
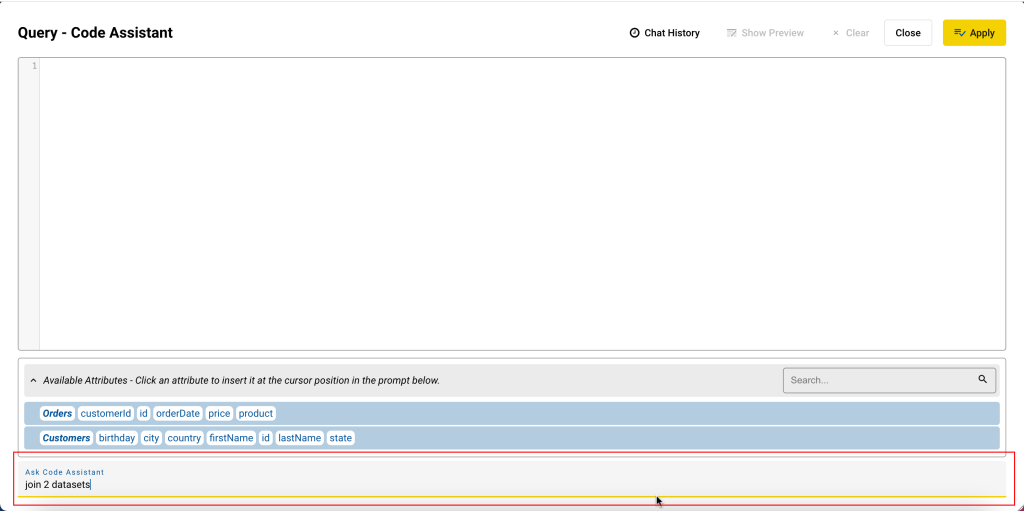
- Press Enter.
The Assistant has provided the code in the Query field.
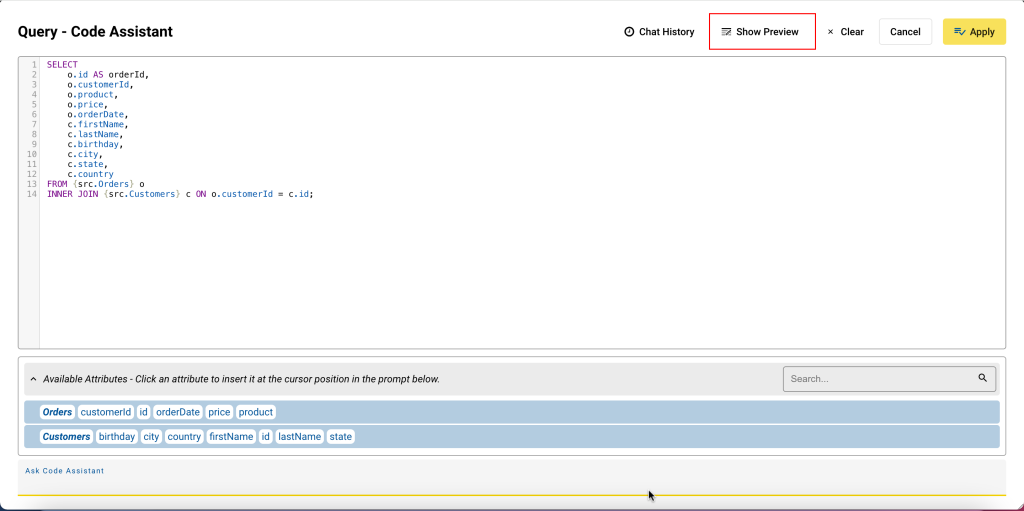
- Click Show Preview to see the result — two datasets being joined.
- Click Apply.
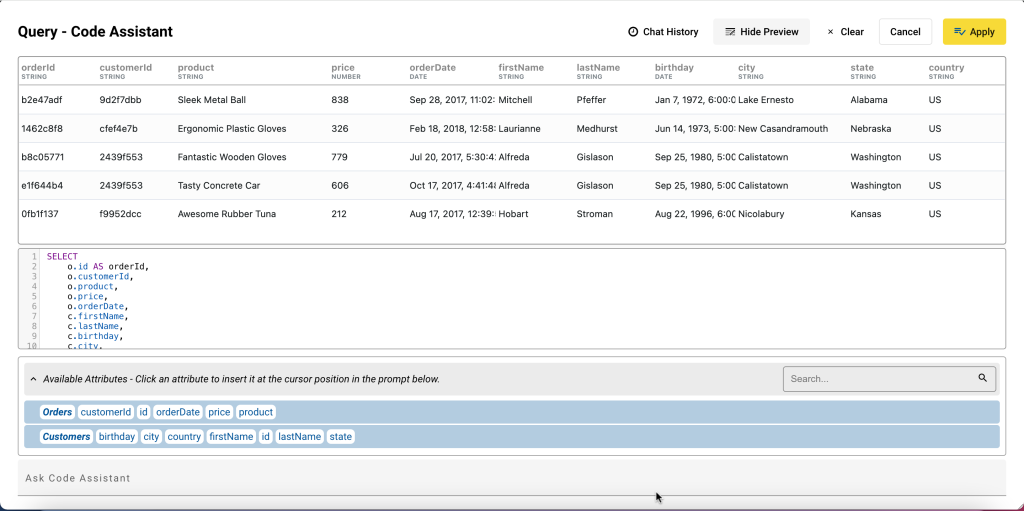
You are taken back to the main configuration window where the query provided by the Assistant is displayed.
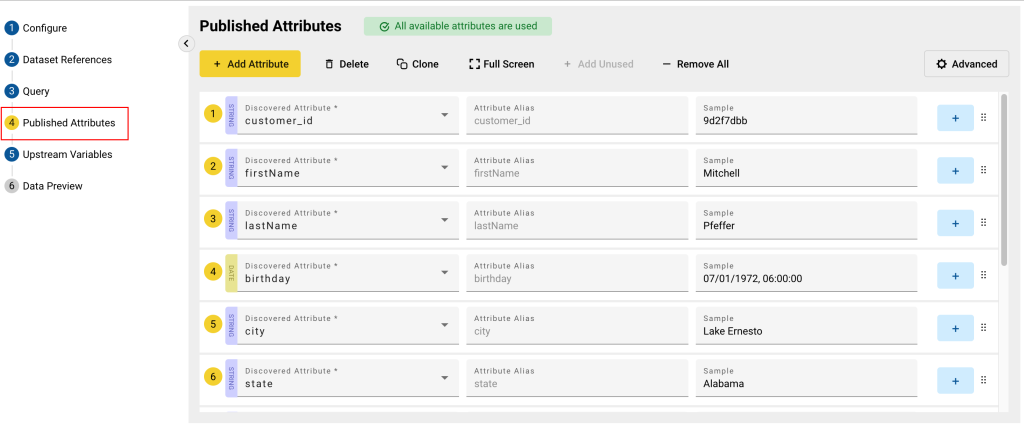
- Click Next to go to Published Attributes.
Here you can see all attributes from the csv files. No changes are needed here.
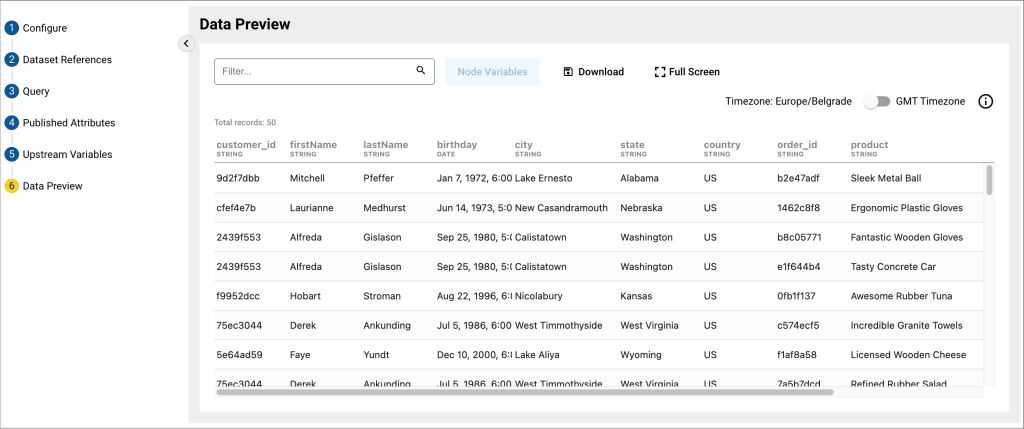
- Click Next to proceed to Data Preview where you should see the end result — two datasets being joined.
- Click Save and Close.
The newly created transform is displayed in the Pipeline, and you can create a visualization off of it.
Example 2: AI Assistant Used to Add Current Date
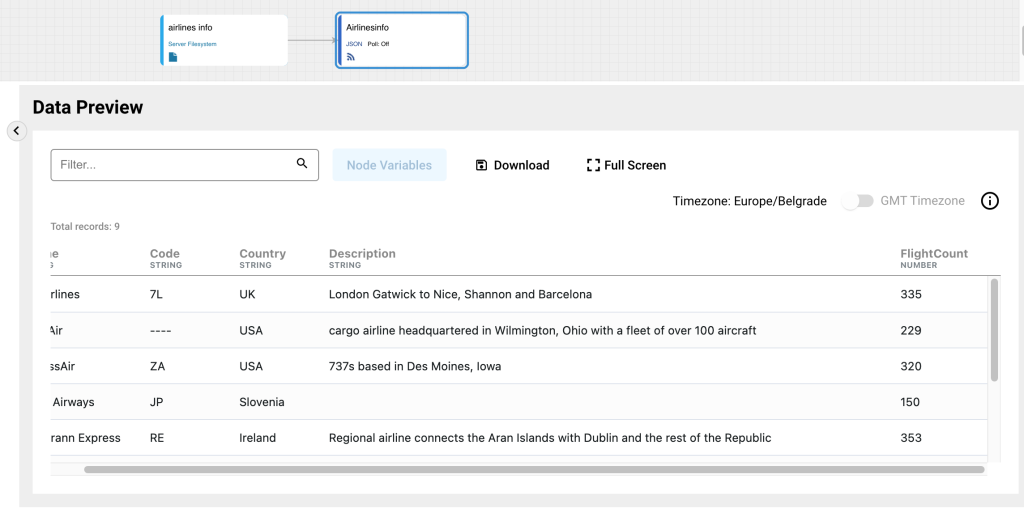
In this example, we are going to use the AI Assistant in the JavaScript transform to add the current date and time to the existing dataset. We are going to use the airlinesinfo.json file.
Step 1: Create JSON Feed
Create a JSON feed by following the steps outlined on this page and use the downloaded airlinesinfo.json file.
Step 2: Create JavaScript Transform
- Hover over the created JSON feed for the gear icon to appear on the right, click the gear icon button in the connection box and select + New Transform.
A pop-up for choosing a Transform Type is displayed. - In the pop-up, select JavaScript.
A new page is displayed. - In Configure, provide a Transform Name (for example, Current time) and click Next to go to Script References. No changes are needed here so click Next to go to Dataset References. Since we only have one dataset, no changes are needed here so click Next to go to Script.
- In Script, delete the default script and click the Code Assist Icon.
A new window where you can interact with the AI Assistant is displayed. - In the prompt field, enter what you want the Assistant to perform.
We want to add the current time to the existing dataset in the format YYYY-MM-DDThh:mm:ss:
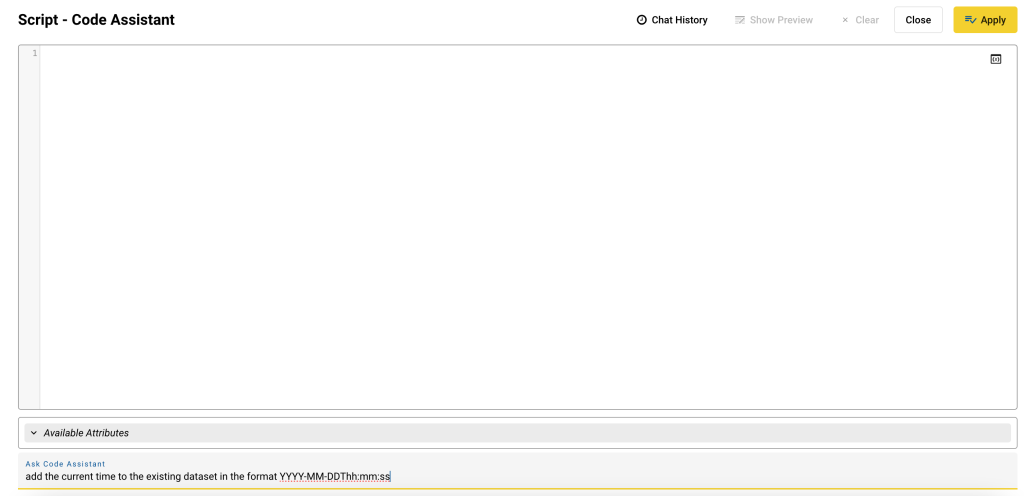
- Press Enter.
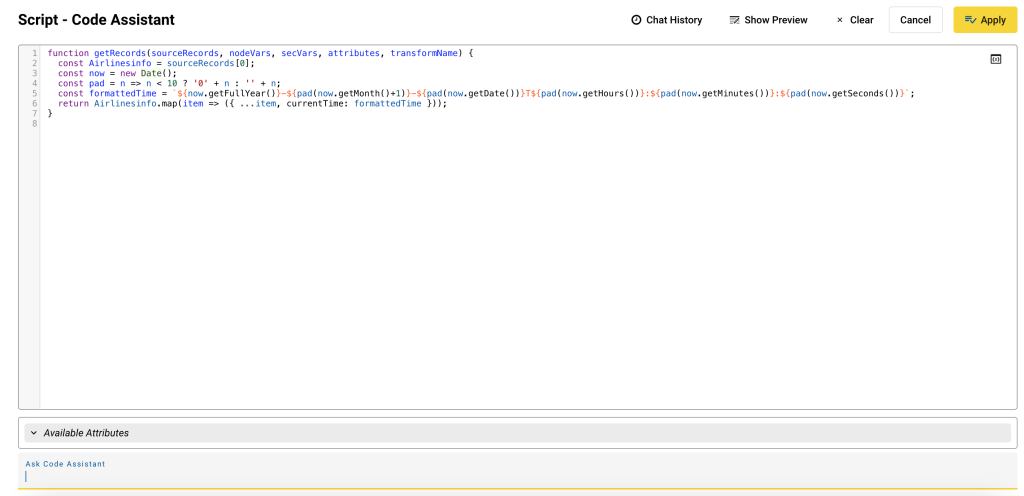
The Assistant has provided the code in the Script field.
- Click Show Preview to see the result — current time being displayed in the specified format.
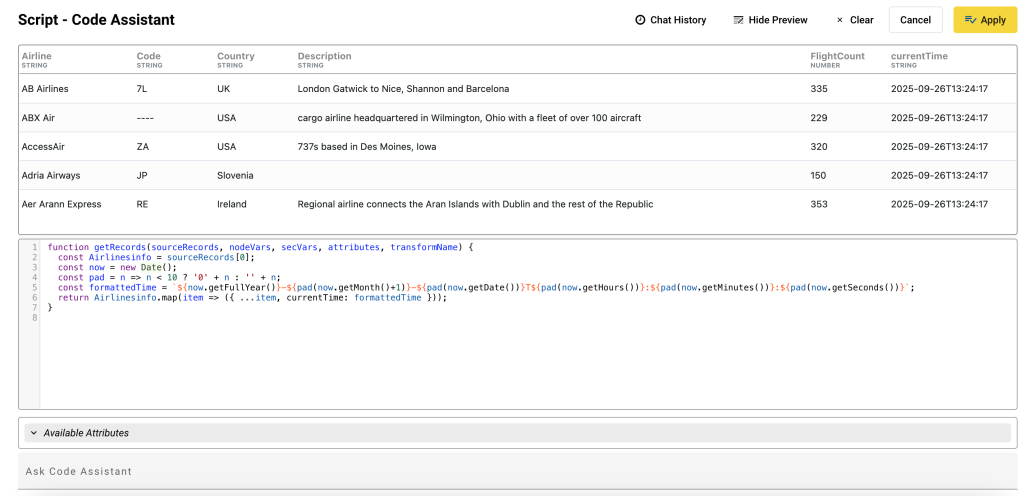
- Click Apply.
You are taken back to the main configuration window where the script provided by the Assistant is displayed. - Go to the Data Preview to see the end result — current time being added to the existing dataset.
- Click Save and Close.
- The newly created transform is displayed in the Pipeline.
Example 3: AI Assistant Used to Sort and Filter Data
In this example, we are going to use the AI Assistant in the SQL transform to:
a) sort column data in descending order
b) filter the highest value in a column
We are going to use the airlinesinfo.json file again and the feed that was created in example 2.
a) Sorting column data in descending order
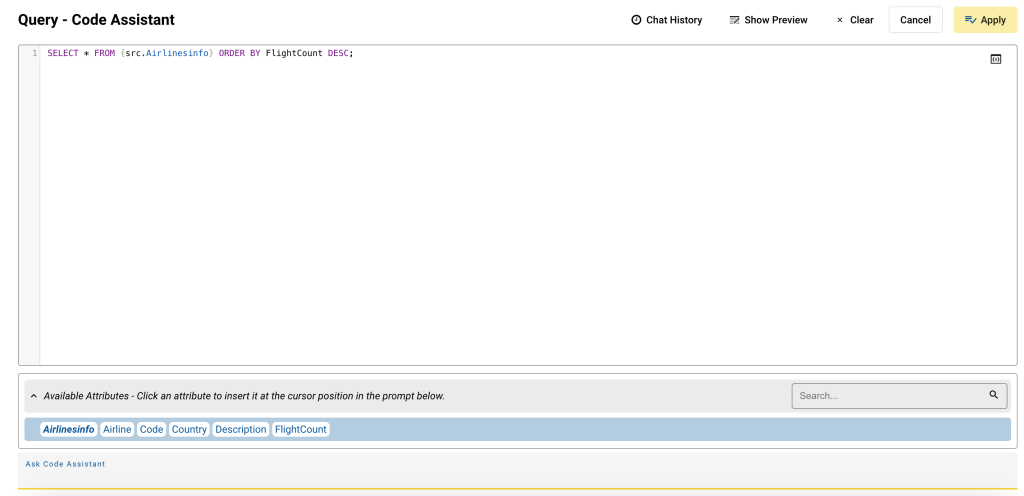
For the purpose of this example, we are going to use the AI Assistant to sort the FlightCount column data in descending order.
- In the pipeline, find the Airlines JSON feed you created in Example 2.
- Off of the JSON feed create a SQL transform.
- In Query, delete the default query and click the Code Assist icon.
A new window where you can interact with the AI Assistant is displayed. - In the prompt field, enter what you want the Assistant to perform.
We want to sort FlightCount in descending order:
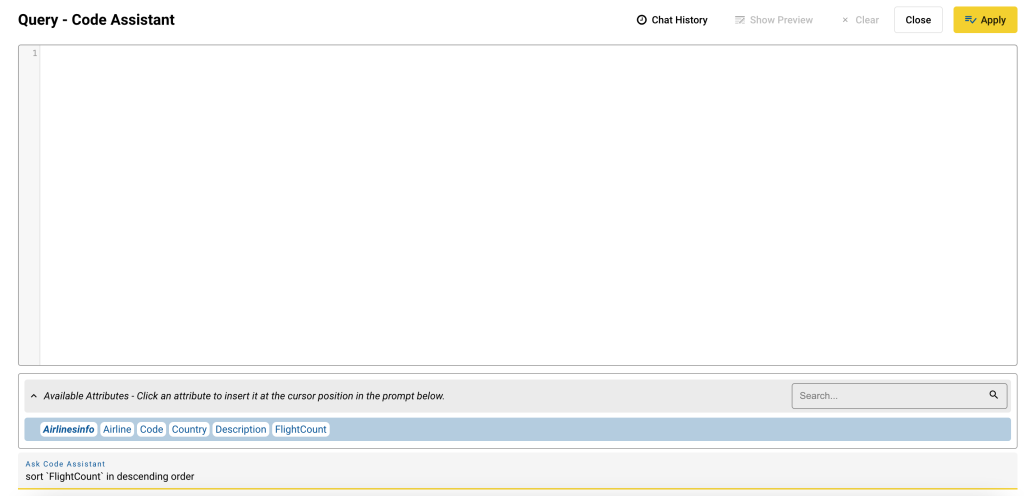
- Press Enter.
The Assistant has provided the code in the Query field.
- Click Show Preview to see the result — FlightCount column being sorted in descending order.
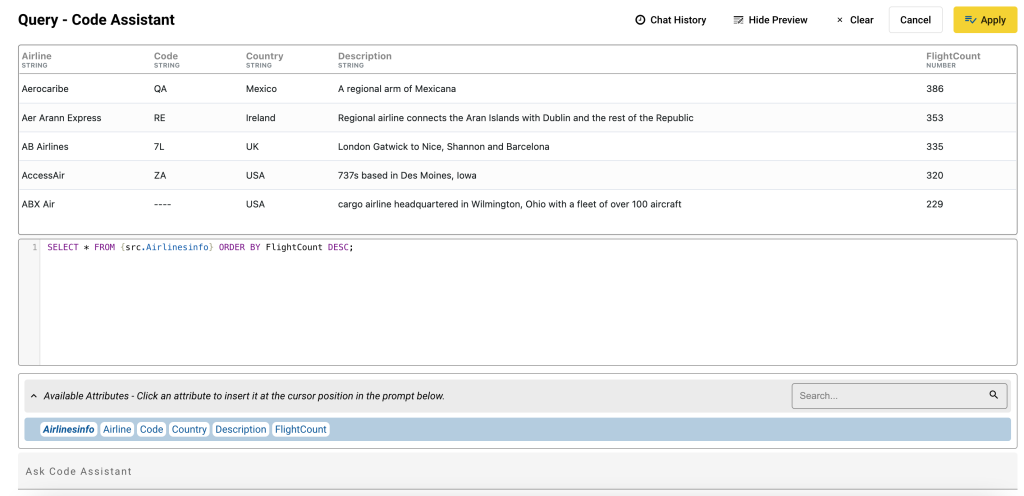
- Click Apply.
You are taken back to the main configuration window where the query provided by the Assistant is displayed. - Go to the Data Preview to see the end result — FlightCount column being sorted in descending order.
- Click Save and Close.
The newly created transform is displayed in the Pipeline.
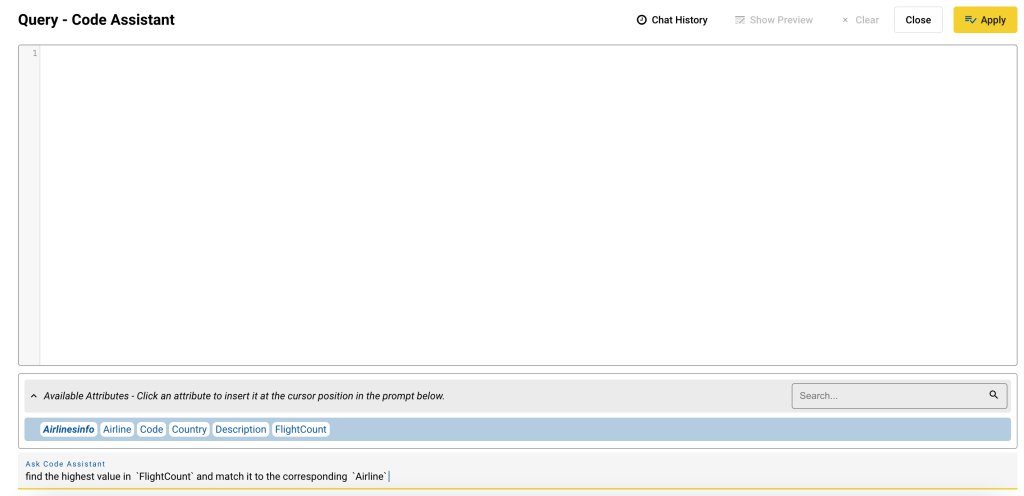
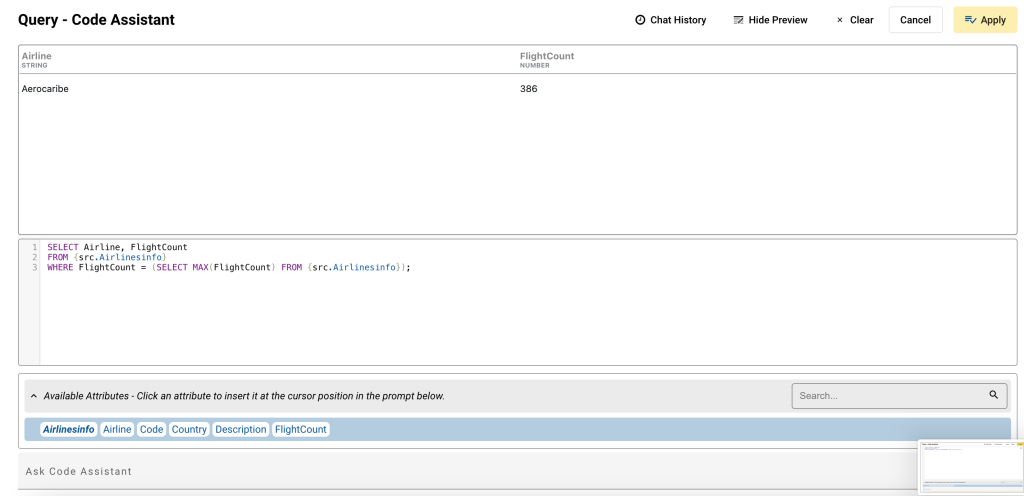
b) Filtering the highest value in a column
For the purpose of this example, we are going to use the AI Assistant to filter the FlightCount column data by the highest value and match it to the corresponding airline.
- In the pipeline, find the Airlines JSON feed you created in Example 2.
- Off of the JSON feed create a SQL transform.
- In Query, delete the default query and click the Code Assist icon.
A new window where you can interact with the AI Assistant is displayed. - In the prompt field, enter what you want the Assistant to perform.
We want to find the highest value in FlightCount and match it to the corresponding airline:
- Press Enter.
The Assistant has provided the code in the Query field.
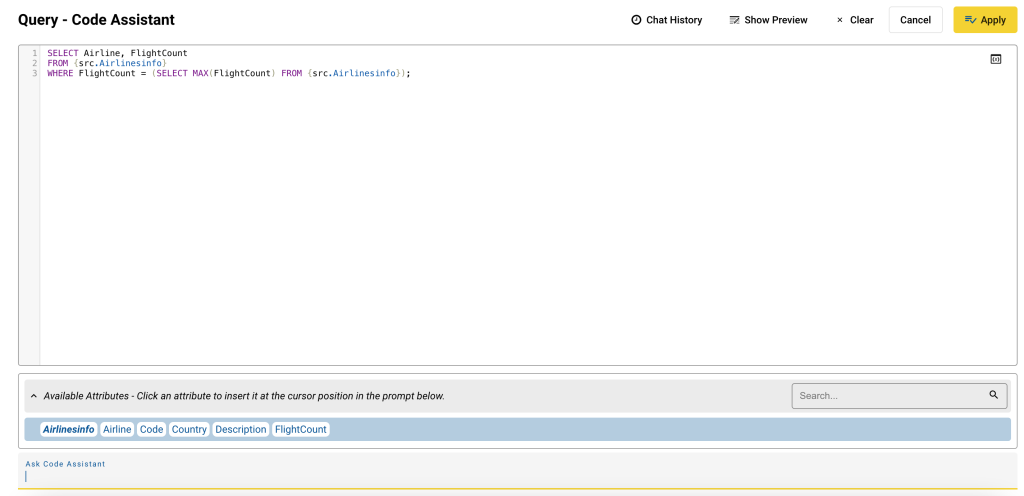
- Click Show Preview to see the result — the highest flight count and the corresponding airline being displayed.
- Click Apply.
You are taken back to the main configuration window where the query provided by the Assistant is displayed. - Go to the Data Preview to see the end result — the highest flight count and the corresponding airline being displayed.
- Click Save and Close.
The newly created transform is displayed in the Pipeline.