Admin Menu
⚠Only admin users can access the Admin menu.
The Admin menu provides a user interface to manage and configure features in edgeCore. When you start up and log into a standalone edgeCore instance for the first time, the instance is not licensed, so you will only have access to the License and Backup & Restore pages.

To expand the admin menu and view the labels or collapse it, click << in the bottom-left corner.
Admin Menu Items
The Admin menu is made up of the following items:
| Admin Menu Items |
Description |
| View Page |
Enables you to see a specific page in View mode; |
| Edit Page |
Enables you to select a specific page and make changes to it as well as perform actions on the page’s visualizations; |
| Pages | Provides a list of all pages you created in edgeCore; Pages represent a named collection of visualizations in edge; |
| Add Page | Enables you to create/add a new page and set an icon for it; |
| Pipeline | Used to manage data in edgeCore; The pipeline provides a visual way to transform or filter raw data in order to create a visualization; |
| Connect | Enables you to connect a variety of different sources and pull in data from them; |
| Provision | Enables you to map users to content, create domains, roles and assign permissions; |
| Backup |
Enables you to back up the system; |
| Rule Sets | Collection of rules used to map values in the data to a visual presentation; |
| Constraints | Used to restrict the input side of a variable; Constraints prevent users from breaking queries and scripts with invalid values; |
| Filters | Filtering used to reduce the number of records displayed in a visualization; |
System Menu
The system menu is accessed by clicking the hamburger menu in the top-left corner. The contents/sections of the system menu are organized around administration functions.
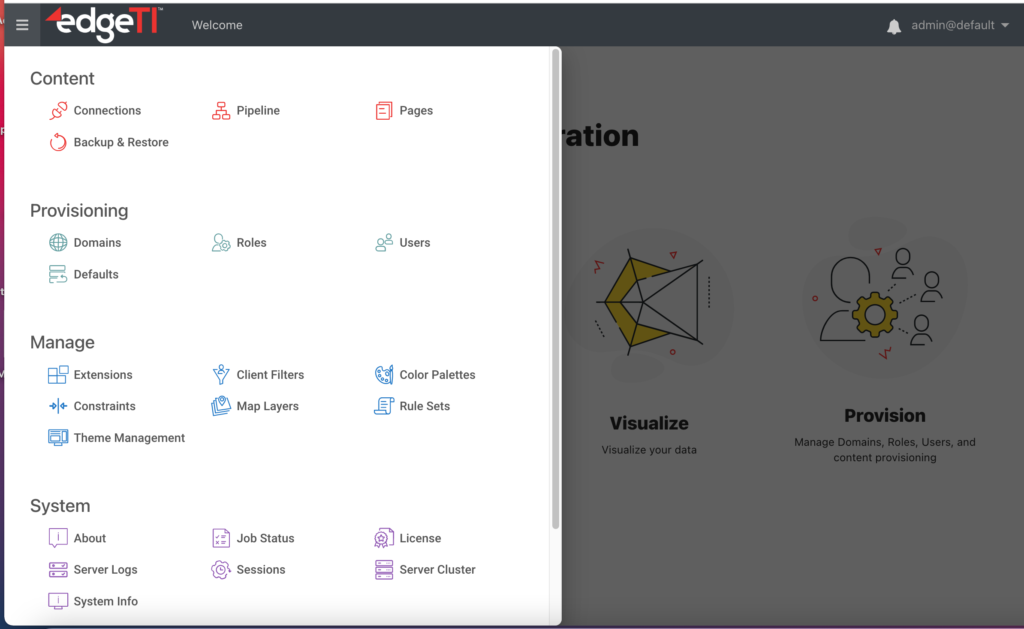
System Menu Sections
The System menu is made up of the following sections:
| System Menu Sections | Description |
| Content | Provides access to the following:
|
| Provisioning | Provides access to the following:
|
| Manage | Provides access to the following:
|
| System | Provides access to the following:
|
| Admin Tools | Provides access to the following:
|
Configuring System Menu
If you do not want the system menu to be on the left side, you can configure it in your custom theme.
- Go to Theme Management.
- Click on your custom theme or create one.
The theme’s properties are displayed on the right. - Access Setting Properties.
- Disable the System Menu on Left toggle switch.

- Save your changes.
- Go to system menu > Provision > Defaults > Preferences and scroll down to the Look and Feel section.
- Select the custom theme.
- Save.
The system menu can now be accessed in the top-right corner.
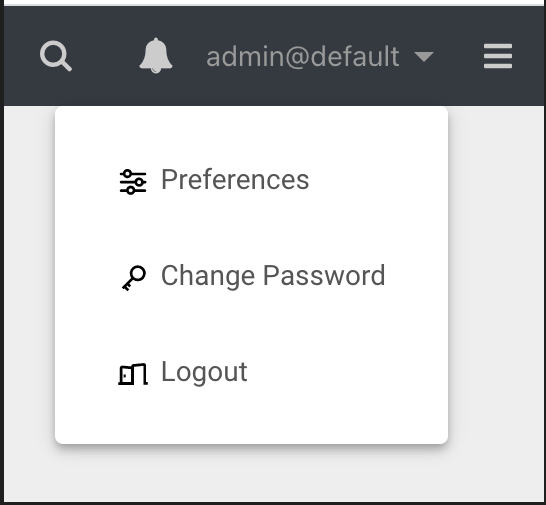
Active User Banner
The username@domain dropdown at the upper-right corner contains the following options:
- Preferences (locale and time zone settings)
- Change Password
- Logout